Strawberry Banana Pudding Dream
If you’re looking for a dessert that feels like a warm hug, then the Strawberry Banana Pudding Dream is for you! This creamy delight combines the sweetness of ripe strawberries and bananas with a rich, velvety pudding base. Whether you’re hosting a family gathering or simply want to treat yourself after a busy week, this dessert is sure to bring smiles all around. Its no-bake nature makes it perfect for those who want something special without spending hours in the kitchen.
This recipe has been a go-to in my household for years. It’s not only delicious but also incredibly easy to prepare. Trust me, once you try this Strawberry Banana Pudding Dream, it will quickly become one of your favorites too!
Why You’ll Love This Recipe
- Easy to Make: This dessert comes together in just 20 minutes! You can whip it up even on the busiest of days.
- Family-Friendly: Kids and adults alike adore this creamy treat. It’s always a hit at gatherings!
- Make-Ahead Convenience: You can prepare it in advance and let it chill in the fridge until you’re ready to serve.
- Delicious Layers: The combination of bananas and strawberries creates a flavor explosion that is simply irresistible.
Ingredients You’ll Need
You won’t need any fancy ingredients for this delightful dish—just simple and wholesome items that you might already have at home! Here’s what you’ll need to create your own Strawberry Banana Pudding Dream:
For the Layers
- 2 boxes Vanilla Wafers
- 6 to 8 bananas, sliced
- 1 container strawberries
For the Pudding Mixture
- 2 cups milk
- 1 (5 oz.) box French Vanilla pudding
- 1 (8 oz.) package cream cheese
- 1 (14 oz.) can sweetened condensed milk
For Topping
- 1 (12 oz.) container whipped topping
Variations
One of the best things about this recipe is how flexible it is! Feel free to get creative with your ingredients. Here are some fun ideas to switch things up:
- Add Other Fruits: Toss in some blueberries or peaches for an extra fruity twist.
- Change Up the Wafer: Use chocolate wafers instead of vanilla for a chocolatey flavor.
- Make It Gluten-Free: Swap out regular vanilla wafers for gluten-free versions.
- Try Different Puddings: Experiment with coconut or banana pudding for new taste sensations.
How to Make Strawberry Banana Pudding Dream
Step 1: Prepare the Creamy Mixture
In a mixing bowl, combine the cream cheese and sweetened condensed milk. Mixing these two until smooth is key because it creates a rich base for your pudding. It’s important not to skip this step; otherwise, you might end up with lumps in your pudding!
Step 2: Add Pudding and Milk
Next, add the French Vanilla pudding and milk. Stir until everything is well combined. This step ensures that your pudding will be creamy and full of flavor. The vanilla pudding adds that lovely touch that pairs beautifully with our fruity layers.
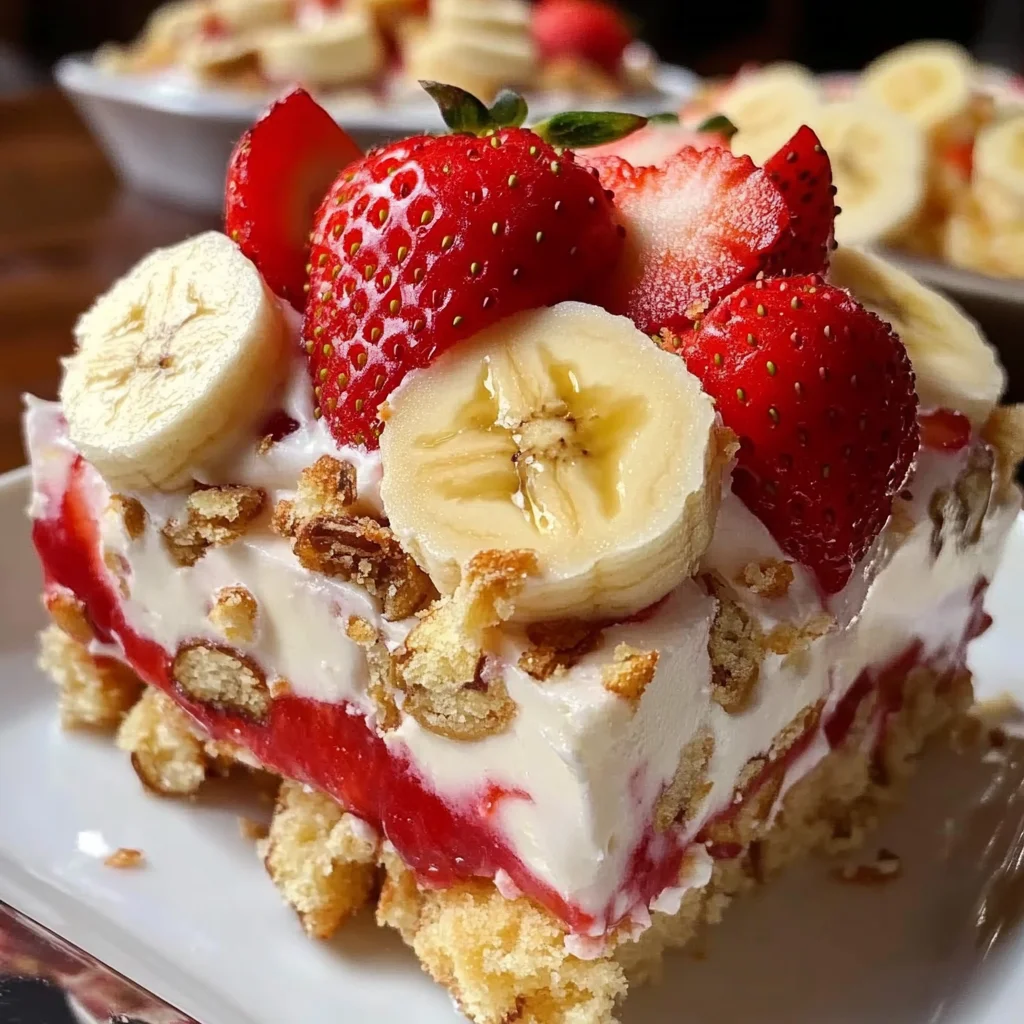
Step 3: Layering Time!
In a large serving dish, start layering! Begin with a layer of vanilla wafers, followed by slices of bananas, then add some strawberries. Pour half of your creamy pudding mixture over these lovely layers. Remember, layering is where all the magic happens!
Step 4: Repeat Those Layers
Now it’s time to repeat! Add another layer of vanilla wafers, bananas, and strawberries. Don’t forget to finish off with the remaining pudding mixture on top—this will be the star of your dessert.
Step 5: Top It Off
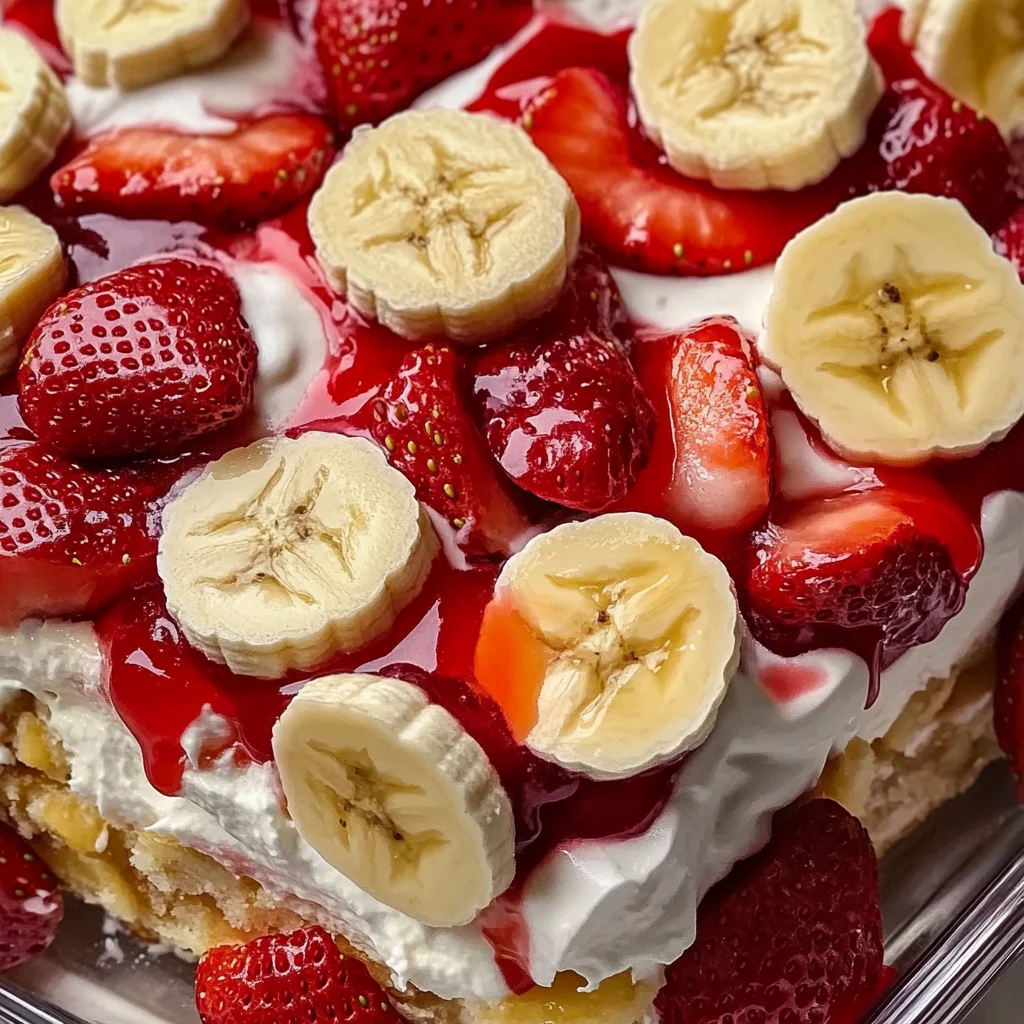
Spread the whipped topping over your final layer as a fluffy crown! This adds a delightful lightness that balances out the richness below.
Step 6: Chill Out!
Refrigerate your creation for at least 4 hours before serving. This chilling time lets all those wonderful flavors meld together into pure bliss.
Now you’re ready to enjoy this delightful Strawberry Banana Pudding Dream! Trust me; every bite will make you feel like you’re walking through summer fields filled with fresh fruit. Enjoy!
Pro Tips for Making Strawberry Banana Pudding Dream
Creating the perfect Strawberry Banana Pudding Dream can be a fun and rewarding experience! Here are some helpful tips to ensure your dessert turns out delicious every time.
-
Use ripe fruit – Selecting bananas and strawberries that are perfectly ripe not only enhances the flavor but also adds a natural sweetness to your pudding, making it more enjoyable.
-
Chill your ingredients – For an extra creamy texture, consider chilling the cream cheese, whipped topping, and milk before mixing. This helps achieve a smooth consistency in the pudding base.
-
Layer with care – When layering the wafers, fruit, and pudding mixture, take your time to create even layers. This will not only make for a beautiful presentation but also ensure balanced flavors with every bite.
-
Let it set – Allowing the dessert to chill for at least four hours (or overnight if possible) is crucial. This resting period helps all the flavors meld together beautifully while giving the pudding a chance to firm up.
-
Experiment with flavors – Don’t hesitate to add a splash of vanilla extract or almond extract to your pudding mixture for an additional layer of flavor. It can give your dessert a delightful twist!
How to Serve Strawberry Banana Pudding Dream
Serving Strawberry Banana Pudding Dream is all about presentation and pairing it with complementary flavors. Here are some ideas to make your dessert shine!
Garnishes
-
Fresh mint leaves – A few sprigs of mint not only add a pop of color but also provide a refreshing contrast to the sweetness of the pudding.
-
Sliced strawberries or bananas – Adding extra slices of fresh fruit on top creates visual appeal and allows guests to see what deliciousness awaits them inside!
Side Dishes
-
Fruit Salad – A light and refreshing fruit salad made with seasonal fruits is a great side dish that balances the richness of the pudding.
-
Granola Parfait – Layering granola with yogurt and fresh fruit can offer a crunchy contrast to the creamy pudding while keeping things light.
-
Ice Cream – A scoop of vanilla or strawberry ice cream on the side can elevate your dessert experience, adding an extra cool factor that everyone will love.
-
Lemon Sorbet – The tartness of lemon sorbet is perfect for cutting through the sweetness of the pudding, providing a refreshing palate cleanser between bites.
Enjoy creating this delightful Strawberry Banana Pudding Dream! Whether it’s for a family gathering or just because you feel like indulging, this dessert is sure to please everyone at the table.
Make Ahead and Storage
This Strawberry Banana Pudding Dream is perfect for meal prep! You can make it a day in advance, allowing the flavors to meld beautifully as it chills in the refrigerator.
Storing Leftovers
- Cover any leftover pudding tightly with plastic wrap or transfer it to an airtight container.
- Store in the refrigerator for up to 3 days.
- Enjoy the delicious layers within that time frame for optimal freshness!
Freezing
- It’s best not to freeze this dessert, as the whipped topping and bananas may change texture upon thawing.
- If you do want to freeze it, consider omitting the bananas until you’re ready to serve.
Reheating
- Since this is a no-bake dessert, you won’t need to reheat it.
- Just take it out of the fridge and enjoy chilled!
FAQs
If you have questions about your Strawberry Banana Pudding Dream, you’re not alone! Here are some common inquiries.
Can I use other fruits in my Strawberry Banana Pudding Dream?
Absolutely! While strawberries and bananas are classic choices, feel free to experiment with blueberries, raspberries, or even peaches for a delightful twist.
How long does Strawberry Banana Pudding Dream last in the fridge?
Your delicious creation will last about 3 days when stored correctly in the refrigerator. Just be sure to cover it well!
What can I use instead of whipped topping in my Strawberry Banana Pudding Dream?
If you’d like a homemade touch, you can whip up some heavy cream with a bit of sugar and vanilla extract. This will give you a fresh and creamy topping without using store-bought whipped topping.
Is Strawberry Banana Pudding Dream suitable for special occasions?
Absolutely! This dessert is a crowd-pleaser for potlucks, birthdays, and family gatherings. Its vibrant colors and creamy texture make it a showstopper!
Final Thoughts
I truly hope you enjoy making this delightful Strawberry Banana Pudding Dream as much as I do! This recipe is not only simple but also brings joy with each creamy bite. Gather your loved ones around this sweet treat and create wonderful memories together. Happy baking!
Strawberry Banana Pudding Dream
Experience the delightful Strawberry Banana Pudding Dream, a no-bake dessert that’s both creamy and refreshing. This layered treat combines luscious vanilla pudding with the natural sweetness of ripe strawberries and bananas, all elegantly held together by layers of vanilla wafers. Perfect for family gatherings or a simple indulgence after a busy day, this dessert is quick to prepare and will surely bring smiles to everyone around the table. With its vibrant colors and delectable flavors, this pudding dream is not just a dessert; it’s a celebration of fresh fruit and creamy goodness.
- Prep Time: 20 minutes
- Cook Time: None
- Total Time: 0 hours
- Yield: Serves approximately 12 people 1x
- Category: Dessert
- Method: No-bake
- Cuisine: American
Ingredients
- 2 boxes vanilla wafers
- 6 to 8 sliced bananas
- 1 container strawberries
- 2 cups milk
- 1 (5 oz.) box French vanilla pudding
- 1 (8 oz.) package cream cheese
- 1 (14 oz.) can sweetened condensed milk
- 1 (12 oz.) container whipped topping
Instructions
- In a mixing bowl, blend cream cheese and sweetened condensed milk until smooth.
- Stir in French vanilla pudding mix and milk until well combined.
- In a large serving dish, layer vanilla wafers, bananas, and strawberries. Pour half of the pudding mixture over the top.
- Repeat layers with remaining ingredients, finishing with the last of the pudding mixture.
- Spread whipped topping over the final layer.
- Chill for at least 4 hours before serving to let flavors meld.
Nutrition
- Serving Size: 1 serving
- Calories: 320
- Sugar: 36g
- Sodium: 200mg
- Fat: 16g
- Saturated Fat: 9g
- Unsaturated Fat: 5g
- Trans Fat: 0g
- Carbohydrates: 40g
- Fiber: 2g
- Protein: 4g
- Cholesterol: 30mg