Easy Halloween Dipped Oreo Cookies Recipe
If you’re looking for a fun and easy treat to get into the Halloween spirit, you’ve come to the right place! The Easy Halloween Dipped Oreo Cookies Recipe is not just a crowd-pleaser; it’s also a delightful way to spend time in the kitchen with your little ones. These cookies are perfect for family gatherings, Halloween parties, or even just a cozy night at home. Plus, they’re so simple to make that you’ll find yourself whipping them up time and again!
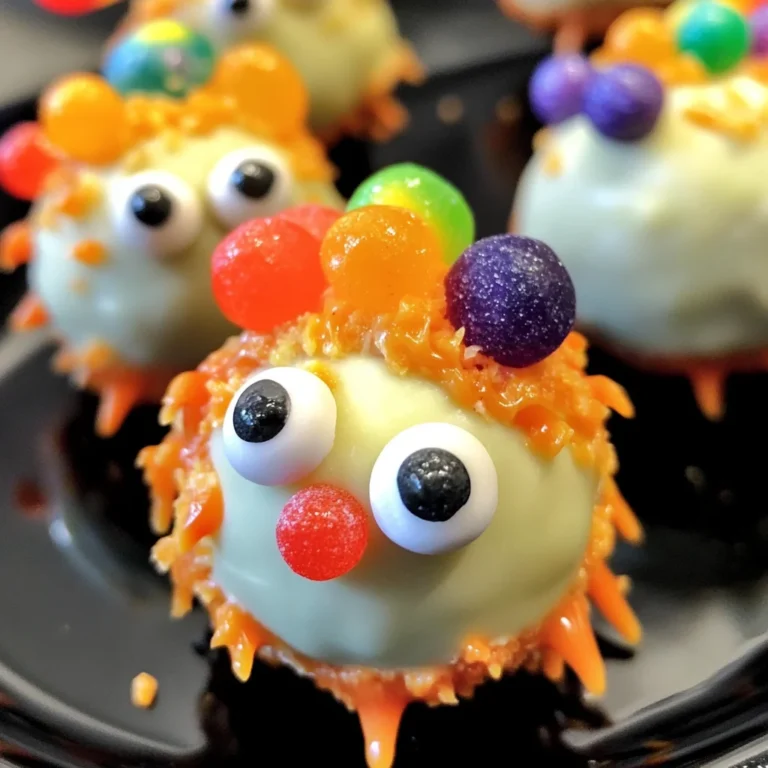
What makes this recipe special is not only its ease of preparation but also the creative freedom it offers. You can decorate these cookies however you like, turning each one into a spooky mummy or a silly monster. Trust me; these treats will bring smiles all around!
Why You’ll Love This Recipe
- Super easy to make: With just a few simple steps, even novice bakers can whip up these delicious cookies in no time!
- Fun for everyone: Kids love getting involved in decorating their own cookies, making this a great family activity.
- Versatile decorations: Use sprinkles and candy eyes to create endless designs—let your imagination run wild!
- Perfect for sharing: With 36 cookies per batch, there’s plenty to go around for parties or trick-or-treaters.
- Quick prep and cook time: In just 25 minutes, you can have a festive dessert ready to impress your guests.

Ingredients You’ll Need
You’ll be happy to know that making these spooky treats requires simple and wholesome ingredients! Here’s what you’ll need:
- 1 package Halloween Oreos (or any type of sandwich cookie)
- 6 oz chocolate melting wafers
- 6 oz orange candy melting wafers
- 8 oz white candy melting wafers
- 6 oz purple candy melting wafers
- sprinkles and candy eyes
Variations
One of the best things about this Easy Halloween Dipped Oreo Cookies Recipe is how flexible it can be! Feel free to get creative with different flavors and decorations. Here are some fun ideas:
- Change up the cookies: Try using different types of sandwich cookies like peanut butter or mint-flavored varieties for unique taste combinations.
- Use dark chocolate: Swap regular chocolate melting wafers for dark chocolate if you prefer that richer flavor.
- Add toppings: Experiment with crushed nuts or colorful candies as additional toppings along with sprinkles.
- Make seasonal versions: Change the colors of the candy melts based on other holidays—red and green for Christmas, pastel colors for Easter!
How to Make Easy Halloween Dipped Oreo Cookies Recipe
Step 1: Prepare Your Workspace
Start by lining a cookie sheet with wax paper or parchment paper. This is important because it keeps your cookies from sticking while they cool down. A clean workspace will help everything go smoothly!
Step 2: Melt the Candy Wafers
In a microwave-safe bowl, melt your candy melts in 30-second increments until they’re fully softened (about one minute total). Stir between increments for an even melt. This step is crucial because properly melted wafers will give your cookies that smooth finish we all love.
Step 3: Dip Your Cookies
Take one Oreo cookie and dip it into the melted candy with a spoon until it’s completely covered. Using a fork, lift it out and gently tap it against the side of the bowl to remove any excess coating. This ensures each cookie has just the right amount of sweetness without being overly messy!
Step 4: Decorate Immediately
Transfer the dipped cookie onto your prepared cookie sheet right away. While the coating is still wet, sprinkle your favorite decorations on top so they stick perfectly. This part is where creativity shines—make sure to have fun with it!
Step 5: Let Them Harden
Allow your cookies to harden at room temperature for about one hour. Once they’re set, use a piping bag with a small tip to add mummy designs if you wish! This final touch adds character and turns each cookie into its own spooky masterpiece.
And there you have it—your Easy Halloween Dipped Oreo Cookies are ready to be enjoyed! Whether you’re sharing them at a party or keeping them for yourself (no judgment here!), they’re sure to delight everyone who tries them. Happy baking!
Pro Tips for Making Easy Halloween Dipped Oreo Cookies Recipe
Creating these delightful treats is a breeze, and with a few expert tips, you can make them even more spooktacular!
-
Choose Your Chocolate Wisely: Opt for high-quality candy melting wafers as they melt smoothly and coat your cookies evenly. This ensures a glossy finish and enhances the overall look of your spooky creations.
-
Use a Deep Bowl: When melting your candy melts, use a deep bowl to make dipping easier. It allows the Oreos to be fully submerged without needing to adjust or flip them too much, preventing any breakage.
-
Work Quickly: Candy melts can harden fast! After dipping each cookie, sprinkle your toppings immediately while the chocolate is still wet. This helps the decorations stick perfectly without any hassle.
-
Chill for Perfect Coating: If you’re finding it tricky to get an even coat, try chilling your dipped Oreos in the fridge for about 10 minutes before adding designs. This helps them set faster and makes decorating easier.
-
Get Creative with Designs: Don’t hesitate to mix colors! Instead of just using one color for each cookie, swirl different colors together for a fun marbled effect—perfect for those crafty spirits out there!
How to Serve Easy Halloween Dipped Oreo Cookies Recipe
These Easy Halloween Dipped Oreo Cookies are perfect for parties, trick-or-treat gatherings, or simply as a festive treat at home. Presenting them in an appealing way can add a touch of charm to your Halloween celebrations.
Garnishes
- Edible Glitter: Sprinkle some edible glitter over the cookies right after decorating to add some sparkle and extra festivity.
- Chocolate Drizzle: Drizzle melted chocolate over the cookies for an elegant touch that enhances their visual appeal—and who doesn’t love more chocolate?
Side Dishes
-
Pumpkin Spice Popcorn: Whip up some popcorn drizzled with pumpkin spice seasoning for a crunchy snack that complements the sweetness of the Oreos.
-
Witch’s Brew Fruit Salad: Combine your favorite seasonal fruits like oranges, grapes, and berries in a whimsical way to create a colorful and refreshing side dish that balances the richness of the cookies.
-
Spooky Vegetable Platter: Serve up fresh veggies cut into ghost shapes using cookie cutters alongside hummus or ranch dip. It’s a fun and healthy contrast that adds vibrant colors to your spread.
-
Graveyard Dirt Cups: Layer crushed chocolate cookies and pudding in cups topped with gummy worms or candy tombstones for an adorable dessert that echoes the Halloween theme beautifully!
With these serving suggestions and pro tips, your Halloween festivities will be both delicious and memorable! Enjoy whipping up these spooky delights!

Make Ahead and Storage
This Easy Halloween Dipped Oreo Cookies Recipe is perfect for meal prep, making it a fantastic treat for gatherings or spooky celebrations. You can easily make these cookies in advance and store them for later enjoyment!
Storing Leftovers
- Store the dipped Oreo cookies in an airtight container.
- Keep them at room temperature if consumed within a week.
- For longer storage, refrigerate the cookies; they can last up to 2 weeks.
Freezing
- Allow the cookies to harden completely before freezing.
- Place them in a single layer on a baking sheet, then freeze until solid.
- Transfer the frozen cookies to a freezer-safe container or bag for up to 2 months.
Reheating
- These cookies do not require reheating; simply enjoy them straight from the fridge or freezer!
- If preferred, let them sit at room temperature for a few minutes before serving.
FAQs
Here are some common questions about this delightful recipe.
Can I use different types of cookies for the Easy Halloween Dipped Oreo Cookies Recipe?
Absolutely! While Oreos are classic, feel free to use any sandwich cookie you love. Just ensure they’re sturdy enough to hold up when dipped.
How long does it take to make the Easy Halloween Dipped Oreo Cookies Recipe?
The total time for this recipe is just 25 minutes, making it a quick and fun treat to whip up!
What can I use instead of candy melting wafers?
You can substitute candy melts with chocolate chips; just be sure to add a small amount of coconut oil or shortening to help them melt smoothly.
How do I get the decorations to stick on my dipped Oreos?
Sprinkle your toppings immediately after dipping while the coating is still wet. This ensures that everything adheres perfectly!
Final Thoughts
I hope you find joy in creating these Easy Halloween Dipped Oreo Cookies! They’re not only simple to make but also bring a delightful touch of fun to any Halloween celebration. Whether you’re sharing them with friends or enjoying them yourself, these spooky treats are sure to be a hit. Enjoy your baking adventure, and don’t hesitate to get creative with your designs—happy decorating!
Easy Halloween Dipped Oreo Cookies

If you’re in search of a delightful and easy treat to celebrate Halloween, look no further than the Easy Halloween Dipped Oreo Cookies Recipe. These fun and colorful cookies are not only a hit at gatherings but are also a fantastic way to engage with your family in the kitchen. With their simple preparation, you can whip up a batch in just 25 minutes. Each cookie can be transformed into spooky mummies or silly monsters using creative decorations, ensuring smiles all around. Perfect for parties or cozy nights at home, these treats are sure to impress!
- Prep Time: 10 minutes
- Cook Time: 15 minutes
- Total Time: 25 minutes
- Yield: Approximately 36 servings 1x
- Category: Dessert
- Method: No-Bake
- Cuisine: American
Ingredients
- 1 package Halloween Oreos (or any sandwich cookie)
- 6 oz chocolate melting wafers
- 6 oz orange candy melting wafers
- 8 oz white candy melting wafers
- 6 oz purple candy melting wafers
- Sprinkles and candy eyes
Instructions
- Prepare your workspace by lining a cookie sheet with wax or parchment paper.
- Melt the candy wafers in a microwave-safe bowl in 30-second increments until smooth, stirring between intervals.
- Dip each Oreo into the melted coating using a spoon; lift it out with a fork and tap off excess.
- Immediately transfer to the prepared sheet and decorate with sprinkles while the coating is still wet.
- Allow cookies to harden for about an hour and add any additional designs.
Nutrition
- Serving Size: 1 serving
- Calories: 110
- Sugar: 10g
- Sodium: 20mg
- Fat: 5g
- Saturated Fat: 2g
- Unsaturated Fat: 3g
- Trans Fat: 0g
- Carbohydrates: 15g
- Fiber: 0g
- Protein: 1g
- Cholesterol: 0mg