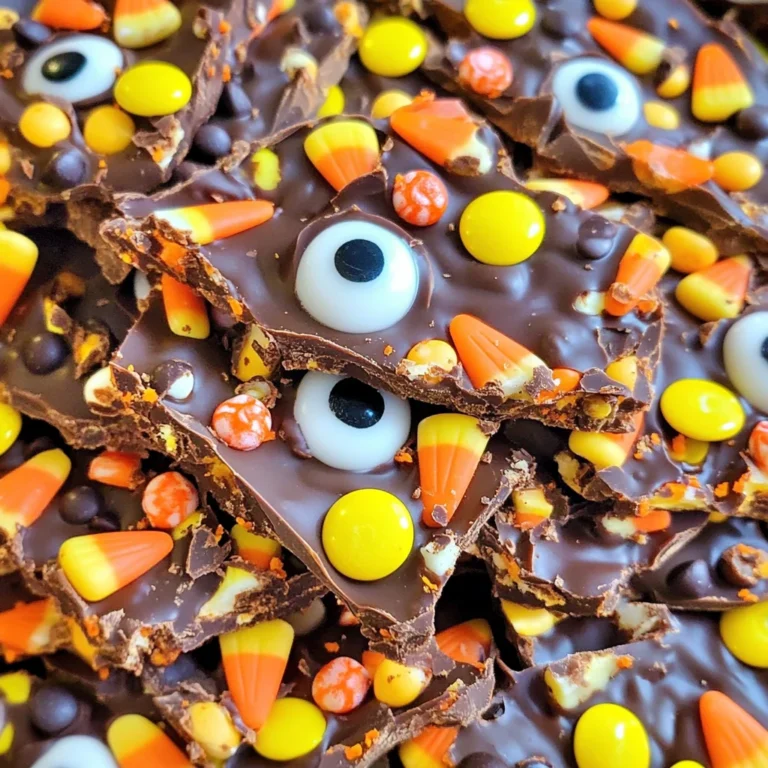
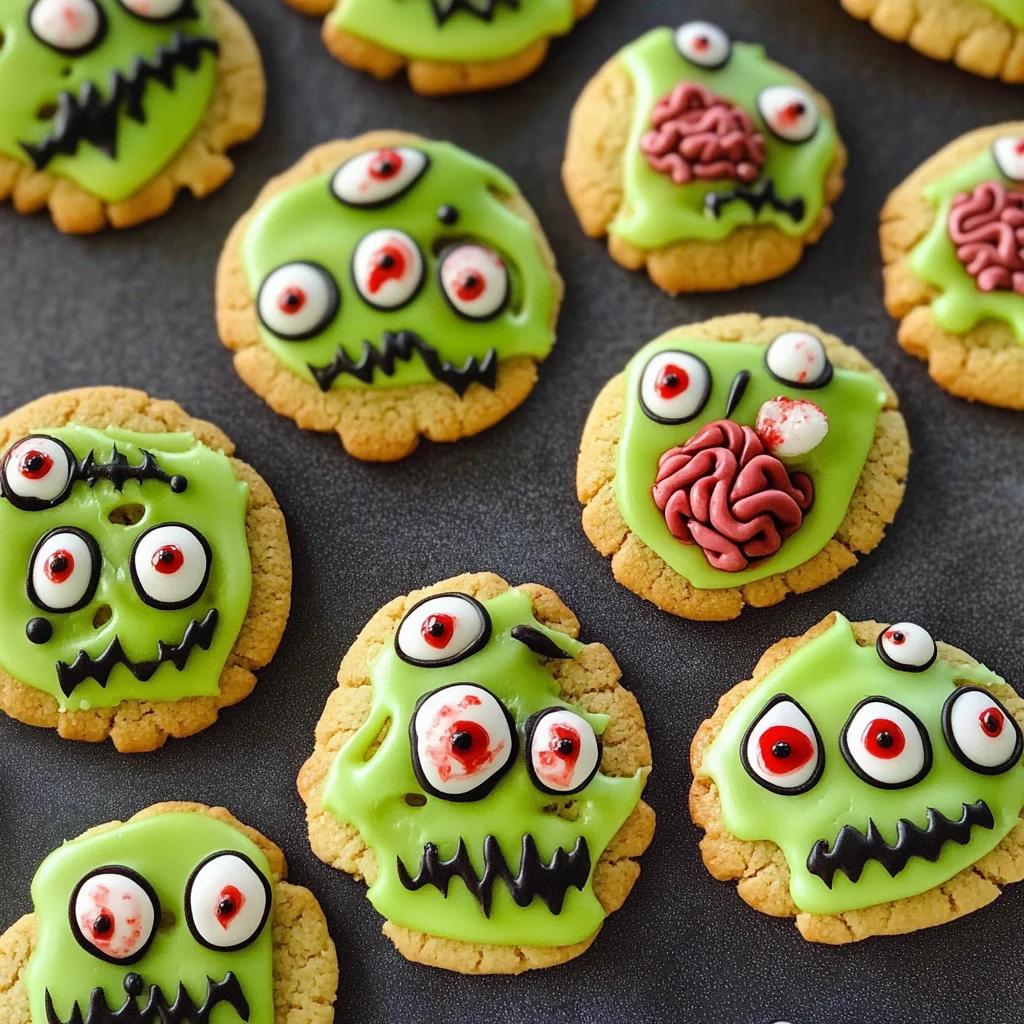
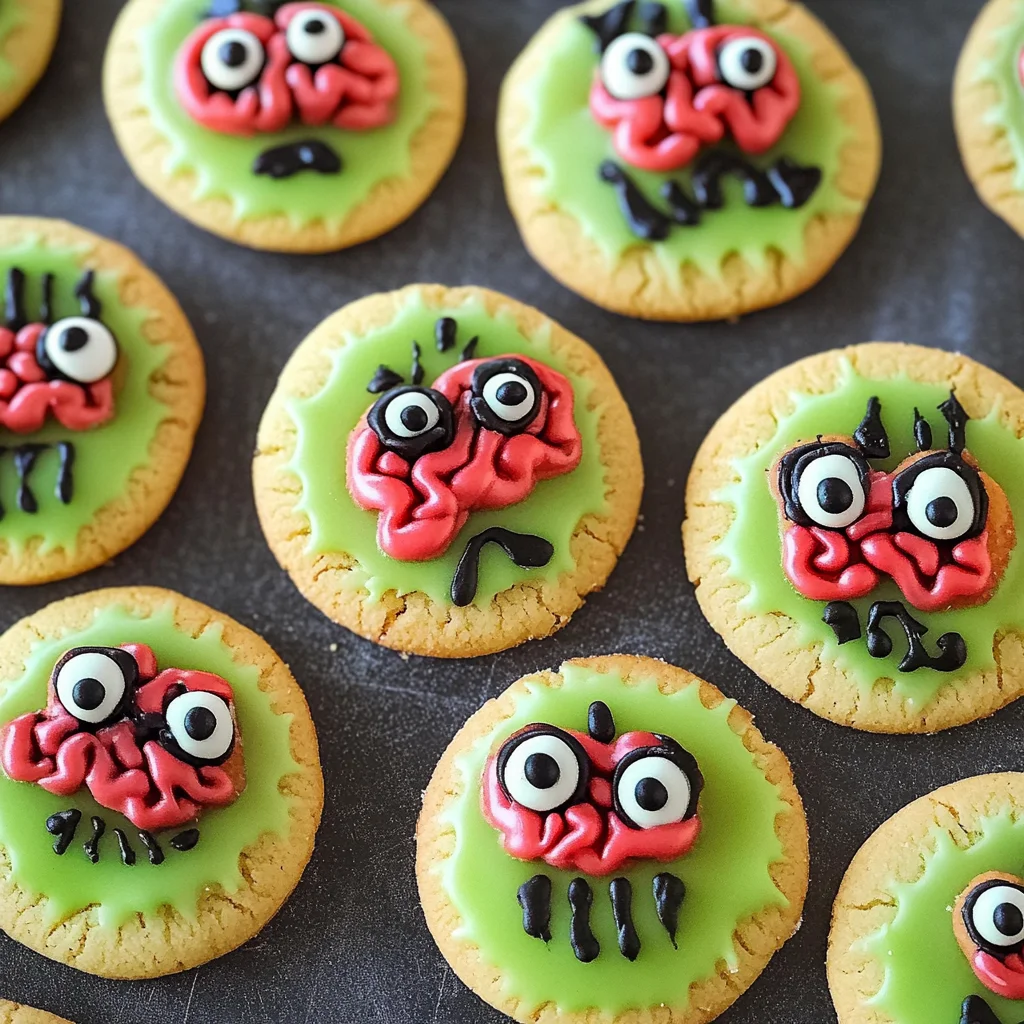
mini zombie cookies
If you’re looking for a fun and festive treat to celebrate Halloween, these mini zombie cookies are sure to delight! They are not only adorable but also delicious and easy to make. Picture this: a spooky gathering with friends, laughter filling the air, and these cute little zombie cookies stealing the show. What makes them special is that they can be a fun activity for the whole family—perfect for busy weeknights or weekend baking sessions!
These mini zombie cookies are perfect for Halloween parties or even as a sweet surprise for your kids’ lunchboxes. With their vibrant colors and playful designs, they’ll bring smiles to faces of all ages.
Why You’ll Love This Recipe
- Easy to Make: The steps are simple and straightforward, making it great for bakers of any level.
- Family-Friendly Fun: Kids will love decorating their own mini zombies, turning baking into a creative activity.
- Adorable Presentation: These cookies are as cute as they are tasty—a perfect addition to any Halloween spread.
- Make-Ahead Option: You can prepare the cookie dough in advance, making it easier to whip up a batch when you’re ready.
Ingredients You’ll Need
To create these delightful mini zombie cookies, you’ll need some simple and wholesome ingredients that you might already have at home. Gather your supplies, and let’s get started!
For the Cookies
- cookie dough
For the Icing
- royal icing
Tools
- circle cookie cutter (2-inches)
- food coloring (Electric Green, Electric Pink, Red Red and Super Black)
- jumbo candy eyes
- red food coloring pen (optional if using these Halloween candy eyes)
- disposable decorating bags
- couplers
- decorating tips (sizes 2, 3, and 4)
Variations
This recipe is wonderfully flexible! You can easily add your twist to make these cookies uniquely yours.
- Change Up the Colors: Instead of green and pink, use your favorite colors for different themes or holidays!
- Add Flavor Variants: Mix in some vanilla or almond extract into your cookie dough for an extra layer of flavor.
- Swap the Toppings: Use chocolate chips instead of candy eyes for a different look—and taste!
- Decorate with Sprinkles: Top off your zombie cookies with Halloween-themed sprinkles for an added festive touch.
How to Make mini zombie cookies
Step 1: Prepare the Cookie Dough
Start by preparing your cookie dough according to your favorite recipe. Roll it out to about 1/4-inch thick. Using a circle cookie cutter, cut out circles from the dough. This shape is perfect because it allows ample space for decorating later on!
Step 2: Bake the Cookies
Once you’ve cut out all your circles, bake them according to the recipe instructions. It’s important to let them cool completely before moving on to decorating; warm cookies can make icing slide right off!
Step 3: Prepare Royal Icing
Next up is the royal icing! Prepare it according to your recipe and divide it into bowls. Working in small batches helps keep things manageable. Remember, you want some icing thicker than others—this will help maintain shapes when piping.
Step 4: Tint Your Icing
Time to color up! Tint some icing light pink for brains (just a drop or two), green for the base of our zombies, black for details like mouth and “X” eyes, and red for that spooky blood effect. Don’t forget to thin down the green icing with drops of water so it pipes nicely!
Step 5: Fill Your Decorating Bags
Prepare your decorating bags with different tips. Fill two bags with size 2 tips using black and red icings. Use a size 3 tip bag for green icing and size 4 tip bag for pink icing. Make sure they’re tightly closed with rubber bands before starting!
Step 6: Decorate Your Cookies
Now comes the fun part—decorating! Start by outlining each cookie with green icing around the edges but leave the very top open. Let that set up a bit before adding brains by piping pink icing at the top.
Fill in each cookie with green icing after that initial outline has set slightly—this will help keep everything neat! Place a candy eye on each while gently pressing down so it sticks well. Use black icing to pipe an “X” for an eye and squiggles for mouths; finish off with splashes of red icing as blood drips!
And there you have it—your very own mini zombie cookies just in time for Halloween celebrations! Enjoy every bite while sharing them with friends and family!
Pro Tips for Making mini zombie cookies
These mini zombie cookies are not just fun to make; they’re a delightful way to impress your guests this Halloween!
-
Use fresh ingredients: Ensuring that your ingredients, especially the food coloring and royal icing, are fresh will give your cookies vibrant colors and better taste.
-
Pipe with confidence: Don’t be shy when piping the icing! A steady hand ensures cleaner lines and a more professional-looking cookie.
-
Let layers dry: Allow each layer of icing to dry before adding another. This prevents colors from mixing and helps maintain those sharp lines.
-
Experiment with decorations: Feel free to get creative with additional decorations like sprinkles or candy pieces. Unique touches can really personalize your cookies!
-
Practice makes perfect: If this is your first time decorating cookies, don’t worry if they aren’t perfect. Each batch is a learning experience, so have fun with it!
How to Serve mini zombie cookies
Presenting your mini zombie cookies in a creative way can make them even more appealing! Here are some fun ideas for serving them at your next Halloween gathering.
Garnishes
- Sprinkles: Add some spooky black or orange sprinkles on top of the wet icing for an extra festive touch.
- Edible glitter: A sprinkle of edible glitter can give these ghoulish treats an enchanting shimmer that kids and adults alike will love.
Side Dishes
- Witch’s Brew Punch: Create a refreshing green punch using lime soda and sherbet. It’s a bubbly drink that pairs perfectly with the eerie theme of the cookies.
- Ghostly Fruit Platter: Assemble a selection of fruits like bananas, grapes, and strawberries arranged to resemble ghostly figures. This adds a healthy option alongside your sweet treats.
- Pumpkin Spice Popcorn: Whip up some popcorn tossed with pumpkin spice seasoning for a crunchy snack that complements the sweet cookies.
- Veggie Skeleton Tray: Arrange colorful veggies in the shape of a skeleton. This not only adds contrast to the sweetness but also keeps things balanced and festive!
With these serving ideas, your mini zombie cookies will surely steal the spotlight at any Halloween celebration! Enjoy creating and sharing these deliciously spooky treats!
Make Ahead and Storage
These mini zombie cookies are not only adorable but also perfect for meal prep, making them a fantastic treat for your Halloween celebrations or any festive gathering. You can easily prepare them in advance and store them, so you’re all set for the spooky season!
Storing Leftovers
- Keep your mini zombie cookies in an airtight container at room temperature for up to 5 days.
- If you have decorated cookies, ensure they are completely dry before stacking them to prevent smudging.
Freezing
- Place undecorated cookies in a single layer on a baking sheet and freeze until solid.
- Once frozen, transfer them to a freezer-safe bag or container, where they can last up to 3 months.
- Decorated cookies can also be frozen; just place parchment paper between layers to avoid sticking.
Reheating
- For best results, let frozen cookies thaw at room temperature for a few hours before serving.
- If you need to soften them slightly, you can microwave them on low power for about 5-10 seconds.
FAQs
Here are some common questions about making mini zombie cookies that might help you out!
Can I make mini zombie cookies ahead of time?
Absolutely! You can bake and decorate these cookies a few days in advance. Just store them properly to keep them fresh.
What is the best way to decorate mini zombie cookies?
Using royal icing gives you great control over details. Pipe outlines with colored icing and add candy eyes for that extra spooky touch!
Can I use other colors besides green and pink for my mini zombie cookies?
Yes! Feel free to get creative with your color palette. Just remember that Halloween is all about fun and creativity!
How do I store leftover mini zombie cookies?
Store your leftover mini zombie cookies in an airtight container at room temperature for up to five days.
Final Thoughts
I hope you enjoy making these delightful mini zombie cookies as much as I do! They’re not only a fun treat for Halloween but also a wonderful way to share some spooky joy with friends and family. Whether you’re hosting a party or just want something festive to nibble on, these little ghouls are sure to bring smiles all around. Happy baking, and don’t forget to let your creativity shine!
Mini Zombie Cookies

Get ready to impress your friends and family this Halloween with these delightful mini zombie cookies! Fun, festive, and utterly adorable, these cookies are perfect for any spooky gathering. With their vibrant colors and playful designs, they not only serve as a delicious treat but also as a creative baking project that the whole family can enjoy together. Whether you’re hosting a party or looking to surprise your kids with a sweet snack in their lunchboxes, these mini zombie cookies will steal the show!
- Prep Time: 30 minutes
- Cook Time: 10 minutes
- Total Time: 40 minutes
- Yield: Approximately 20 cookies
- Category: Dessert
- Method: Baking
- Cuisine: American
Ingredients
- cookie dough
- royal icing
- food coloring (Electric Green, Electric Pink, Red Red, Super Black)
- jumbo candy eyes
- optional: red food coloring pen for detailing
Instructions
- Prepare your cookie dough according to your favorite recipe and roll it out to 1/4-inch thick. Cut out circles using a 2-inch circle cookie cutter.
- Bake the cookies as per your recipe instructions and allow them to cool completely.
- Prepare royal icing by following your recipe and divide it into bowls. Color the icing using food coloring for decorating.
- Fill disposable decorating bags with different colored icings using various piping tips.
- Decorate the cookies by outlining with green icing, filling in with colored icing after setting, adding candy eyes, and piping details like mouths and blood effects.
Nutrition
- Serving Size: 1 cookie (20g)
- Calories: 85
- Sugar: 9g
- Sodium: 35mg
- Fat: 3g
- Saturated Fat: 1g
- Unsaturated Fat: 2g
- Trans Fat: 0g
- Carbohydrates: 13g
- Fiber: 0g
- Protein: 1g
- Cholesterol: 5mg