Oreo Dump Cake
If you’re looking for a dessert that’s both delicious and super easy to make, you’ve landed in the right place with this Oreo Dump Cake. This recipe is a true crowd-pleaser, combining layers of chocolatey goodness with everyone’s favorite cookies. It’s perfect for busy weeknights when you want something sweet without spending hours in the kitchen or for family gatherings where everyone is sure to ask for seconds.
What makes this Oreo Dump Cake so special is not just its rich, gooey texture but also how simple it is to whip up. With just a handful of ingredients and minimal prep time, you’ll have a luscious dessert that feels indulgent yet effortless. Trust me—once you take that first bite, it will become a go-to treat you’ll want to share at every occasion!
Why You’ll Love This Recipe
- Quick and Easy: With just 10 minutes of prep time, you can have this dessert ready for baking in no time.
- Family-Friendly: Everyone loves Oreos! This cake is sure to be a hit with kids and adults alike.
- Minimal Ingredients: Using only five simple ingredients means less fuss and more fun in the kitchen.
- Perfect for Any Occasion: Whether it’s a potluck, birthday party, or just a cozy night in, this cake fits right in.
Ingredients You’ll Need
Let’s gather our ingredients! This recipe uses simple, wholesome items that you probably already have on hand or can easily find at your local grocery store.
For the Cake Layers
- 20 Oreo cookies
- 14 oz sweetened condensed milk (1 can)
- 1 (8 oz) container Cool Whip, thawed
For the Topping
- 1 box chocolate cake mix
- ¾ cup unsalted butter (1½ sticks or 12 tablespoons), cut into small pats
Variations
One of the best things about this Oreo Dump Cake is its flexibility! You can customize it to fit your taste or what you have on hand. Here are a few fun variations to try:
- Add some crunch: Toss in chopped nuts like walnuts or pecans for an added texture.
- Go fruity: Layer in some sliced bananas or strawberries before adding the Cool Whip for a fresh twist.
- Chocolate overload: Mix in mini chocolate chips with the cake mix for even more chocolaty goodness!
- Different cookies: Swap out Oreos for other sandwich cookies like chocolate mint or peanut butter varieties.
How to Make Oreo Dump Cake
Step 1: Preheat the Oven
Start by preheating your oven to 350°F (175°C). This ensures that your cake bakes evenly and comes out perfectly gooey. While it heats up, lightly grease a 9×13-inch baking dish with butter or non-stick spray so nothing sticks!
Step 2: Layer the Oreos
Next, grab those delightful Oreo cookies! Arrange 10 of them in a single layer across the bottom of your greased dish. This forms a delicious base that will soak up all the sweet flavors as it bakes.
Step 3: Add Condensed Milk and Cool Whip
Now it’s time to bring on the sweetness! Evenly pour the sweetened condensed milk over the laid-out Oreos—this will create that luscious layer we all love. Then gently spread the thawed Cool Whip over the milk using a spatula. This creamy layer adds richness and balances out the chocolate.
Step 4: Add Remaining Ingredients
Sprinkle the entire box of chocolate cake mix evenly over the Cool Whip layer. Use a fork to break up any lumps; this helps ensure even baking throughout your cake. The dry mix will absorb moisture from below as it cooks.
Step 5: Top with Butter
Finally, distribute those small pats of butter evenly over the surface of the cake mix. Resist the urge to stir! The butter will melt into everything during baking, creating a crispy top while keeping it soft inside.
Step 6: Bake
It’s time to bake! Place your dish in the preheated oven and let it cook for about 40–45 minutes until the top is bubbly and slightly crisp. Once done, allow it to cool for just a few minutes before serving warm—trust me; you won’t be able to wait long!
Enjoy making this delightful Oreo Dump Cake! It’s sure to bring smiles all around.
Pro Tips for Making Oreo Dump Cake
Making Oreo Dump Cake is a breeze, but a few extra tips can take your dessert to the next level! Here are some tried-and-true suggestions for perfecting this delightful treat.
-
Use room temperature ingredients: Allowing your Cool Whip and sweetened condensed milk to come to room temperature ensures they mix together smoothly, leading to a creamier texture.
-
Experiment with different cookies: While Oreos are classic, feel free to try other sandwich cookies like chocolate mint or peanut butter varieties. This can add a fun twist to the flavor profile!
-
Don’t overmix the cake mix: It’s tempting to stir everything together, but keeping the cake mix layer undisturbed allows it to form that delicious crust on top as it bakes.
-
Check for doneness carefully: Ovens can vary, so keep an eye on your cake as it bakes. You want the top to be bubbly and slightly crisp—overbaking can lead to dryness.
-
Serve warm for the best experience: This dessert is at its best when enjoyed warm from the oven. The gooey center and melted chocolate create an indulgent experience that’s hard to resist!
How to Serve Oreo Dump Cake
Oreo Dump Cake is not only easy to make but also versatile when it comes to serving. Here are some delightful ways you can present this scrumptious dessert!
Garnishes
-
Whipped topping: A dollop of extra Cool Whip on each serving adds an inviting creaminess that pairs perfectly with the rich cake.
-
Chocolate shavings: Grate some chocolate over the top for a touch of elegance and an extra hint of chocolate flavor.
Side Dishes
-
Fresh fruit salad: Light and refreshing, a mix of seasonal fruits like berries and melons complements the richness of the dump cake beautifully.
-
Vanilla ice cream: A scoop of vanilla ice cream served alongside still-warm dump cake creates a delightful contrast in textures and temperatures.
-
Coffee or tea: Pairing your dessert with a warm beverage brings out the flavors even more, making each bite feel even more indulgent.
Whether you’re bringing this dish to a gathering or enjoying it at home, these tips and serving suggestions will ensure that your Oreo Dump Cake is a hit! Enjoy sharing this easy chocolatey delight with friends and family.
Make Ahead and Storage
This Oreo Dump Cake is not only delicious but also perfect for meal prep! You can easily make it ahead of time, making it a fantastic option for gatherings or just to enjoy throughout the week. Here’s how to store any leftovers properly:
Storing Leftovers
- Allow the cake to cool completely before covering it.
- Use an airtight container to keep the cake fresh in the refrigerator.
- It will stay good for up to 3-4 days in the fridge.
Freezing
- If you want to save some for later, slice the cake into individual portions.
- Wrap each piece tightly in plastic wrap and then place them in a freezer-safe bag or container.
- The cake can be frozen for up to 2 months.
Reheating
- To reheat, remove a portion from the freezer and let it thaw in the refrigerator overnight.
- Warm it up in the microwave for about 20-30 seconds or until heated through.
- You can also reheat slices in a preheated oven at 350°F (175°C) for about 10 minutes.
FAQs
Here are some common questions about this delightful Oreo Dump Cake:
Can I use other cookies instead of Oreos in my dump cake?
Absolutely! While Oreos give this dump cake its signature flavor, you can substitute with other chocolate sandwich cookies or even vanilla cookies for a different taste.
How do I make an Oreo Dump Cake from scratch?
For a more homemade version, you could prepare your own chocolate cake batter instead of using a box mix. Just layer your ingredients similarly as described above!
Is Oreo Dump Cake suitable for special occasions?
Yes! This Oreo Dump Cake is perfect for birthdays, potlucks, or any celebration where dessert is needed. Its easy preparation makes it ideal for any occasion.
How many servings does this Oreo Dump Cake yield?
This recipe yields approximately 12 servings, making it great for sharing with family and friends!
Final Thoughts
I hope you feel inspired to whip up this delightful Oreo Dump Cake! With its rich chocolate layers and creamy texture, it’s bound to become a new favorite. Whether you’re serving it at a gathering or treating yourself after a long day, this dessert is sure to bring smiles all around. Enjoy every bite and happy baking!
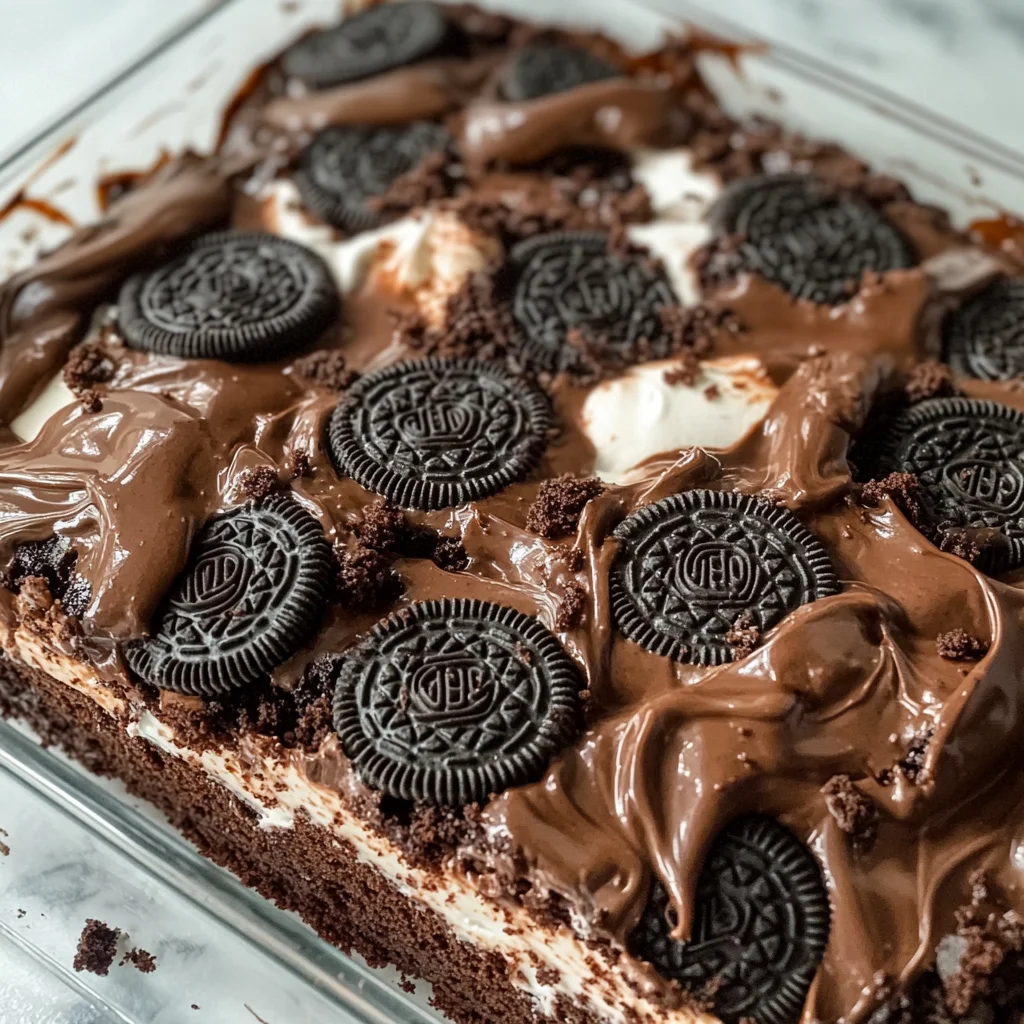
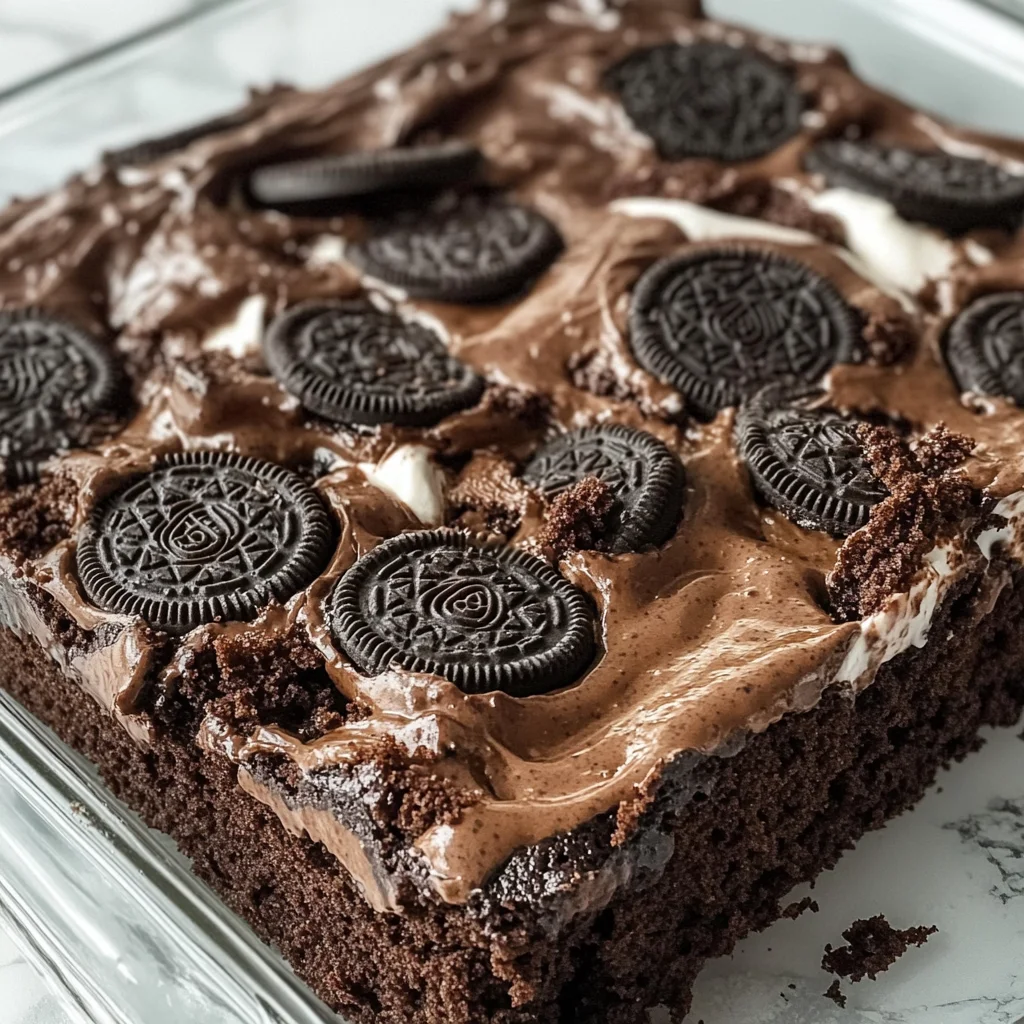
Oreo Dump Cake

Indulge in the ultimate comfort food with this easy-to-make Oreo Dump Cake. This dessert combines the irresistible flavors of chocolate and creamy goodness, making it a favorite for any occasion. With just a few simple ingredients and minimal prep time, you’ll have a delicious treat that is sure to impress family and friends. The layers of chocolate cake mix, sweetened condensed milk, and Cool Whip create a rich, gooey texture that’s absolutely delightful. Perfect for potlucks, birthday parties, or just a cozy night in, this Oreo Dump Cake is bound to be a hit. Get ready for smiles all around as you serve up this crowd-pleaser!
- Prep Time: 10 minutes
- Cook Time: 45 minutes
- Total Time: 55 minutes
- Yield: Approximately 12 servings 1x
- Category: Dessert
- Method: Baking
- Cuisine: American
Ingredients
- 20 Oreo cookies
- 14 oz sweetened condensed milk (1 can)
- 1 (8 oz) container Cool Whip, thawed
- 1 box chocolate cake mix
- ¾ cup unsalted butter (1½ sticks)
Instructions
- Preheat your oven to 350°F (175°C). Grease a 9×13-inch baking dish.
- Arrange 10 Oreo cookies in a single layer at the bottom of the dish.
- Pour the sweetened condensed milk evenly over the Oreos, then spread the Cool Whip on top.
- Sprinkle the entire box of chocolate cake mix over the Cool Whip layer.
- Distribute pats of butter evenly over the cake mix without stirring.
- Bake for 40–45 minutes until bubbly and slightly crisp on top. Allow to cool before serving.
Nutrition
- Serving Size: 1 slice (approximately 100g)
- Calories: 305
- Sugar: 22g
- Sodium: 240mg
- Fat: 15g
- Saturated Fat: 9g
- Unsaturated Fat: 5g
- Trans Fat: 0g
- Carbohydrates: 44g
- Fiber: 2g
- Protein: 3g
- Cholesterol: 33mg