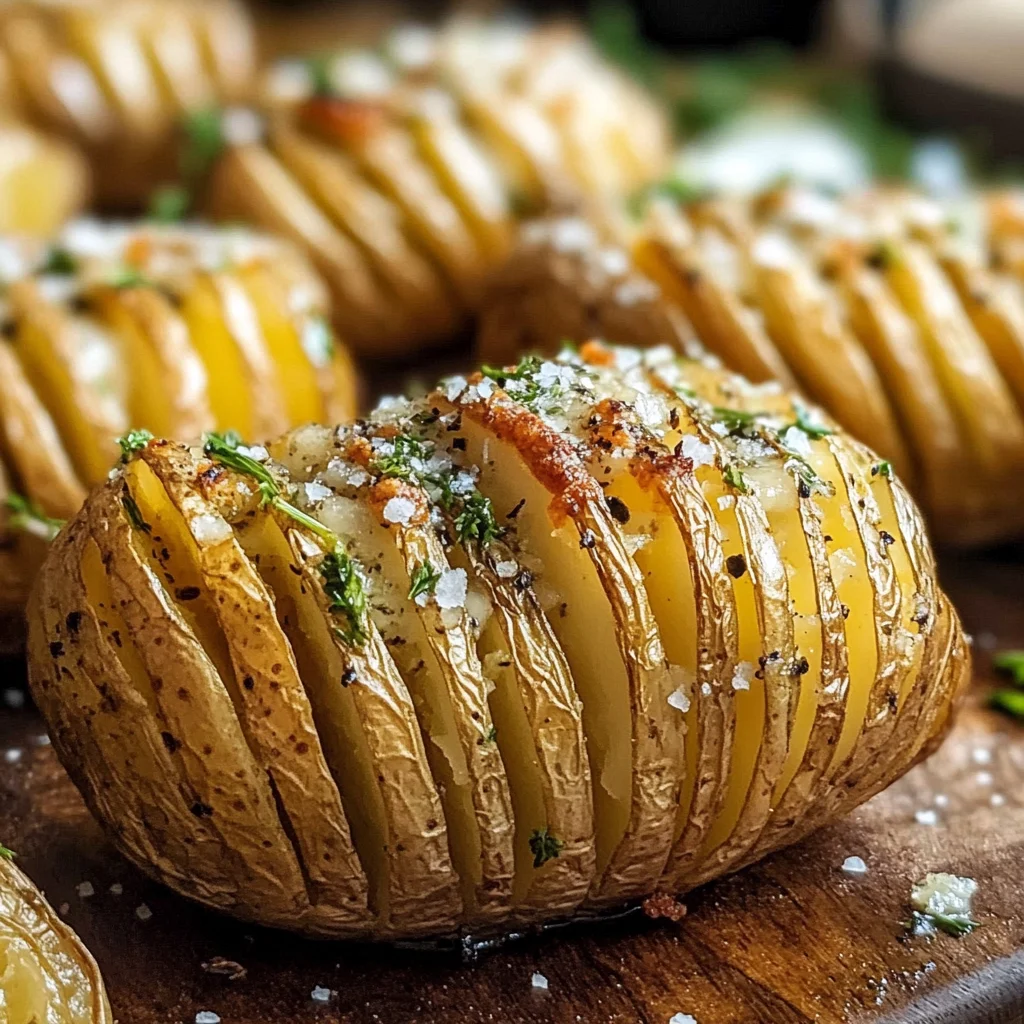
Hasselback Potatoes
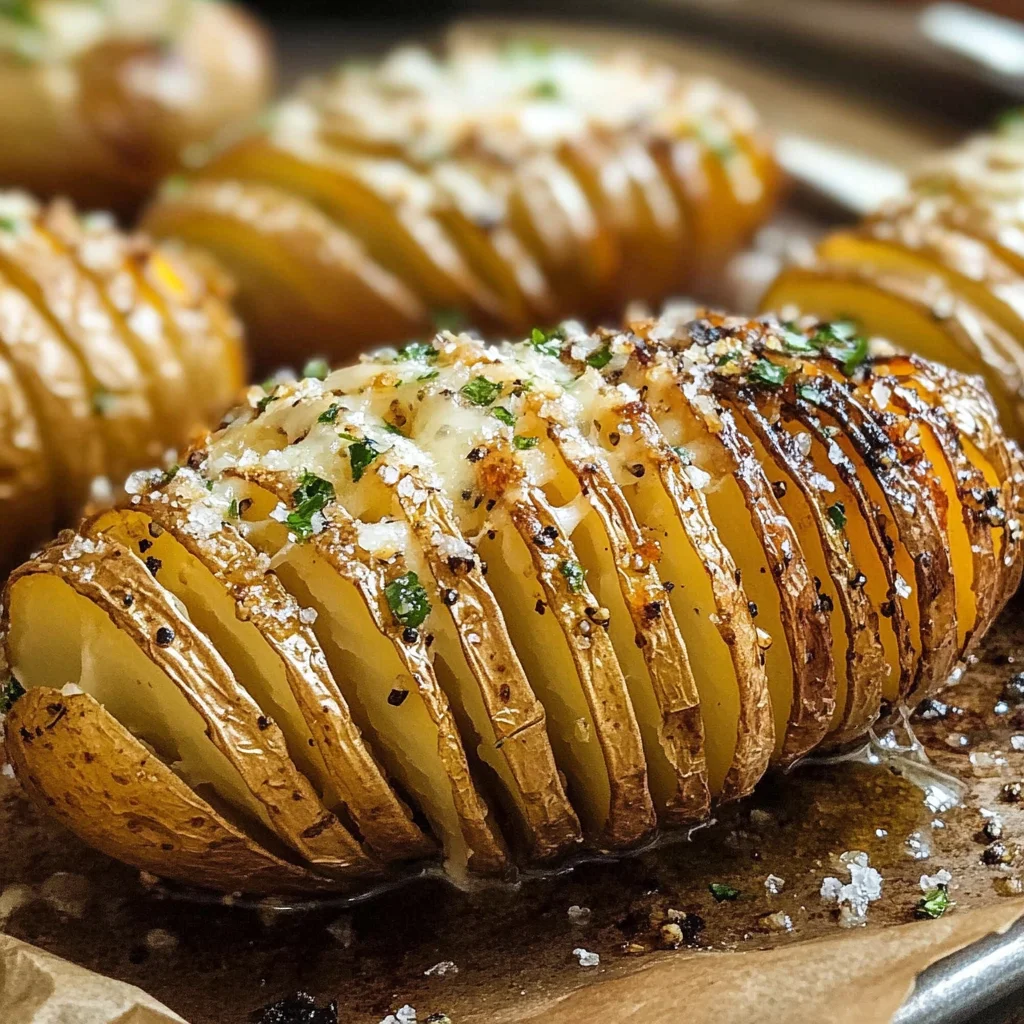
If you’re looking for a delicious side dish that will impress your family and friends, look no further than Hasselback Potatoes! These beautifully sliced russet potatoes are not only visually stunning but also packed with flavor. The crispy edges and tender insides make them a perfect accompaniment to any meal. Whether it’s a busy weeknight dinner or a festive gathering, this recipe is sure to be a hit.
What makes Hasselback Potatoes truly special is their simple elegance. With just a few ingredients, you can create a dish that feels gourmet without the fuss. Plus, they’re so easy to prepare that even novice cooks can master them in no time!
Why You’ll Love This Recipe
- Easy Preparation: Hasselback Potatoes require minimal effort, making them perfect for quick dinners.
- Family-Friendly Appeal: Everyone loves crispy potatoes! They’re sure to please both kids and adults alike.
- Make-Ahead Convenience: You can prep these ahead of time and pop them in the oven when you’re ready.
- Delicious Flavor: The combination of melted butter, salt, and pepper creates an irresistible taste that elevates any meal.
Ingredients You’ll Need
Let’s gather some simple, wholesome ingredients to make these amazing Hasselback Potatoes. You probably have most of these in your pantry already!
- 4 large russet potatoes, (washed and patted dry)
- 4 tablespoons unsalted butter, (melted, divided)
- 1 teaspoon kosher salt
- ½ teaspoon pepper
- Salt and pepper, (to taste)
Variations
One of the best things about Hasselback Potatoes is how flexible they are! Feel free to get creative with these variations:
- Add Herbs: Sprinkle fresh herbs like rosemary or thyme between the slices for an aromatic twist.
- Cheesy Delight: Top with shredded cheese during the last few minutes of baking for a gooey finish.
- Spicy Kick: Add chili flakes or your favorite hot sauce for some heat.
- Vegetable Boost: Stuff the slits with thinly sliced veggies like zucchini or bell peppers for added nutrition.
How to Make Hasselback Potatoes
Step 1: Preheat the Oven
Arrange a rack in the middle position of your oven and preheat it to 425°F. This ensures even cooking and crispy potatoes. While it heats up, set aside an unlined baking sheet.
Step 2: Prepare the Potatoes
Position one potato in between two chopsticks or skewers. This clever trick will help you cut even slits without slicing all the way through. Carefully cut vertical slits about ⅛ inch apart until your knife hits the chopsticks.
Step 3: Coat with Butter
Place your sliced potatoes on the unlined baking dish. Use a basting brush to coat about half of the melted butter all over the potatoes, making sure to get into those lovely slits! This helps create that delicious golden crust we all love.
Step 4: Season Generously
Sprinkle kosher salt and pepper over the potatoes. Don’t be shy—seasoning is key here! It enhances the natural flavors and makes every bite delightful.
Step 5: First Bake
Pop those beauties in the oven and bake for 30 minutes. After this time, use a knife to gently pull apart the layers—this allows additional butter to seep in during the second bake.
Step 6: Final Touches
Brush on the remaining melted butter over the top of each potato. Return them to the oven for another 30-35 minutes until they are crispy on the outside and tender inside. Cooking times may vary based on potato size, so keep an eye on them!
Step 7: Serve Warm
Once done, serve your Hasselback Potatoes warm. Don’t forget to add extra salt and pepper to taste—enjoy every flavorful bite!
Pro Tips for Making Hasselback Potatoes
Making Hasselback Potatoes is a delightful experience, and with these tips, you’ll ensure they turn out perfectly every time!
-
Use chopsticks or skewers: Placing chopsticks or skewers alongside the potatoes helps prevent cutting all the way through, allowing for that beautiful fan effect while keeping the potato intact.
-
Experiment with seasonings: While salt and pepper are classic choices, feel free to get creative by adding garlic powder, paprika, or fresh herbs. This enhances the flavor profile and makes your potatoes uniquely yours.
-
Monitor baking time: Keep an eye on your potatoes towards the end of baking. Ovens can vary, so checking for that perfect crispy exterior is key to achieving that ideal texture.
-
Try different toppings: After baking, consider adding shredded cheese, sour cream alternatives, or crispy onions. These additions can take your Hasselback Potatoes to the next level!
-
Make ahead: If you’re short on time, you can prep the potatoes in advance and store them in the fridge until you’re ready to bake. Just brush them with butter right before placing them in the oven.
How to Serve Hasselback Potatoes
Hasselback Potatoes make an impressive side dish that can elevate any meal. Their unique look and delicious flavor make them a fantastic centerpiece on your dining table!
Garnishes
- Chopped fresh herbs: A sprinkle of parsley or chives adds a burst of color and freshness.
- Vegan sour cream: A dollop of this creamy alternative brings a tangy note that complements the buttery potatoes beautifully.
Side Dishes
- Steamed broccoli: Lightly steamed broccoli adds a nutritious crunch and vibrant green contrast to your plate.
- Garlic roasted asparagus: The earthy flavors of asparagus pair wonderfully with the buttery notes of Hasselback Potatoes.
- Quinoa salad: A refreshing quinoa salad with tomatoes, cucumber, and lemon dressing offers a light and healthy balance to your meal.
- Grilled vegetables: Seasonal grilled veggies provide both flavor and color, creating a well-rounded dish alongside your potatoes.
With these serving suggestions and pro tips, you’re all set to impress family and friends with your delectable Hasselback Potatoes! Enjoy this delightful dish at your next gathering or as a comforting weeknight meal.
Make Ahead and Storage
Hasselback Potatoes are perfect for meal prep! You can easily whip them up ahead of time and store them for later enjoyment, making your weeknight dinners a breeze.
Storing Leftovers
- Allow leftover Hasselback Potatoes to cool completely before storing.
- Place them in an airtight container in the refrigerator.
- They can be stored for up to 3 days.
Freezing
- To freeze, allow the potatoes to cool completely.
- Wrap each potato tightly in plastic wrap or aluminum foil.
- Place wrapped potatoes in a freezer-safe bag and store for up to 2 months.
Reheating
- For best results, reheat in the oven at 350°F for about 15-20 minutes until warmed through and crispy.
- Alternatively, you can microwave them on a plate covered with a damp paper towel for about 2-3 minutes, but they may lose some crispiness.
FAQs
Here are some common questions you might have about Hasselback Potatoes!
Can I make Hasselback Potatoes ahead of time?
Absolutely! You can prepare them up to the baking stage, cover them, and then bake just before serving.
How do I ensure my Hasselback Potatoes cook evenly?
Cutting evenly spaced slits is key. Also, rotating the potatoes halfway through baking helps them cook uniformly.
What should I serve with Hasselback Potatoes?
These delicious potatoes pair wonderfully with grilled vegetables or your favorite protein dish!
Are Hasselback Potatoes healthy?
With minimal butter and simple seasonings, Hasselback Potatoes can be a healthier side option compared to many other potato dishes.
Can I use different types of potatoes for this recipe?
While russet potatoes are traditional, you can experiment with other varieties like Yukon Gold or red potatoes for different flavors and textures!
Final Thoughts
I hope you find joy in making these delightful Hasselback Potatoes! They’re not only a feast for the eyes but also a comforting side that pairs beautifully with almost any main dish. Enjoy the crispy edges and tender insides that make this recipe so special. I can’t wait to hear how yours turn out—happy cooking!
Hasselback Potatoes

Hasselback Potatoes are a stunning and delicious side dish that will elevate any meal. With their crispy edges and tender insides, these beautifully sliced russet potatoes are sure to impress your family and friends. The preparation is simple, making it an ideal choice for both novice cooks and seasoned chefs alike. Just a few basic ingredients come together to create a gourmet feel without the fuss. Bake them to perfection and add your favorite toppings for a delightful twist. Serve warm as a comforting addition to weeknight dinners or festive gatherings.
- Prep Time: 15 minutes
- Cook Time: 65 minutes
- Total Time: 1 hour 20 minutes
- Yield: Serves 4
- Category: Side Dish
- Method: Baking
- Cuisine: American
Ingredients
- 4 large russet potatoes, washed and patted dry
- 4 tablespoons unsalted butter, melted
- 1 teaspoon kosher salt
- ½ teaspoon pepper
Instructions
- Preheat your oven to 425°F (220°C).
- Position each potato between two chopsticks or skewers to prevent cutting all the way through. Slice vertical slits about ⅛ inch apart.
- Place sliced potatoes on an unlined baking sheet and brush half of the melted butter over them, ensuring butter seeps into the slits.
- Season generously with kosher salt and pepper.
- Bake in the preheated oven for 30 minutes; then gently pull apart the layers to allow more butter to seep in.
- Brush the remaining melted butter on top and return to oven for another 30-35 minutes until crispy and tender.
- Serve warm with additional salt and pepper if desired.
Nutrition
- Serving Size: 1 potato (250g)
- Calories: 240
- Sugar: 1g
- Sodium: 420mg
- Fat: 9g
- Saturated Fat: 5g
- Unsaturated Fat: 4g
- Trans Fat: 0g
- Carbohydrates: 36g
- Fiber: 4g
- Protein: 5g
- Cholesterol: 20mg