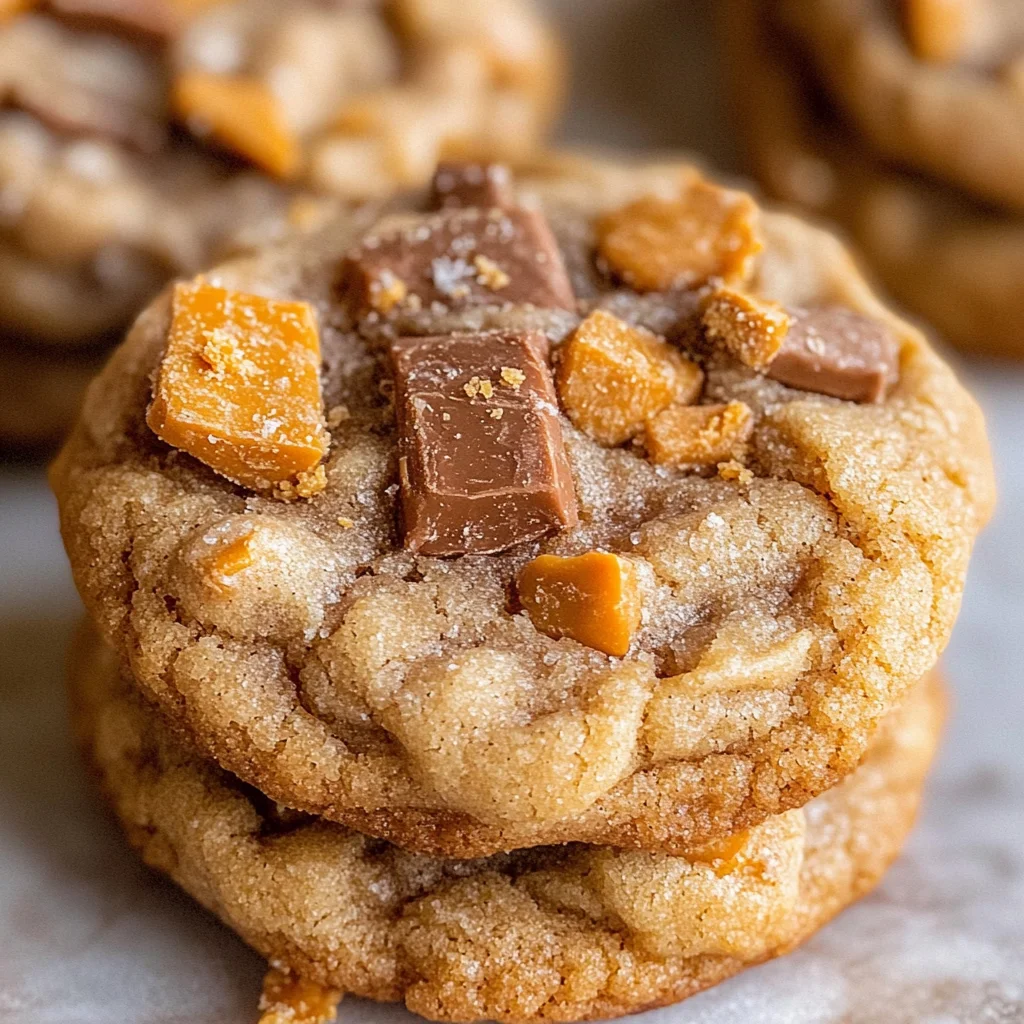
Peanut Butter Butterfinger Cookies
If you’re looking for a cookie that will make your taste buds dance with joy, you’ve come to the right place! These Peanut Butter Butterfinger Cookies are not just any ordinary treat; they are a delightful combination of rich peanut butter and crunchy Butterfinger bits that will leave you craving more. They’re perfect for everything from busy weeknights when you need a sweet pick-me-up to family gatherings where everyone is sure to fall in love with them.
What makes these cookies so special? Well, the soft and thick texture pairs beautifully with the crunchety bits of Butterfinger, giving each bite a satisfying crunch. Trust me, once you take a bite, you’ll understand why this recipe has become a cherished favorite in my kitchen!
Why You’ll Love This Recipe
- Easy to Make: With simple steps and straightforward ingredients, you’ll whip these up in no time!
- Family Favorite: Kids and adults alike adore the peanut buttery goodness mixed with chocolatey crunch.
- Make Ahead Friendly: You can chill the dough or freeze the cookies for later baking—perfect for spontaneous cravings!
- Decadent Flavor: Each cookie is packed with layers of flavor that balance richness and sweetness beautifully.

Ingredients You’ll Need
To create these mouthwatering Peanut Butter Butterfinger Cookies, you’ll only need some simple, wholesome ingredients. Let’s gather everything we need for this delightful treat!
Ingredients:
– 3/4 cup butter (softened (1 and 1/2 sticks))
– 1/2 cup granulated sugar
– 1/2 cup brown sugar (packed)
– 1 cup peanut butter (don’t use natural pb)
– 1 large egg
– 1 & 1/2 teaspoons vanilla
– 1 & 1/2 cups all-purpose flour (spooned and leveled)
– 1/2 teaspoon baking soda
– 1/2 teaspoon baking powder
– 1/4 teaspoon kosher salt
– 16 ounces Butterfinger (chopped, see note*)
Variations
This recipe is wonderfully flexible! Feel free to play around with different flavors or add-ins to make these cookies your own.
- Swap in Different Candy: Try mixing in chopped Reese’s Pieces or M&M’s for an extra layer of fun.
- Go Nut-Free: Substitute sunflower seed butter for peanut butter if you want a nut-free version.
- Add Extra Crunch: Toss in some chopped nuts like pecans or walnuts for an added crunch.
- Experiment with Flavors: Try adding a sprinkling of cinnamon or a touch of coconut extract for a unique twist.
How to Make Peanut Butter Butterfinger Cookies
Step 1: Cream the Butters
In a large bowl or stand mixer, beat 3/4 cup softened butter until it’s smooth and creamy. It’s important to scrape the sides of the bowl so everything gets mixed well. This step creates a fluffy base that will make your cookies light and delicious!
Step 2: Mix in Sugars
Next, add in 1/2 cup granulated sugar and 1/2 cup packed brown sugar. Beat this mixture well for about 2 minutes until it becomes fluffy. Scraping the sides again ensures there are no chunks of butter left behind—trust me, that’s key to achieving cookie perfection!
Step 3: Add Peanut Butter
Now it’s time for the star ingredient! Add 1 cup of your favorite peanut butter (I love Jif). Mixing this in adds that rich flavor we all crave in peanut butter cookies.
Step 4: Incorporate Egg and Vanilla
Add in 1 large egg and 1 & 1/2 teaspoons vanilla extract. Beat until combined. This not only binds your ingredients but also adds moisture and depth of flavor.
Step 5: Combine Dry Ingredients
Now it’s time to add our dry ingredients! Start with 1 & 1/2 cups all-purpose flour, making sure to spoon it into your measuring cup and level off for accuracy. Don’t stir yet—add in 1/2 teaspoon baking soda, 1/2 teaspoon baking powder, and 1/4 teaspoon kosher salt on top of the flour instead. Use your teaspoon to mix those dry ingredients together gently before combining them into your dough later.
Step 6: Mix Until Combined
Turn on your mixer just enough to combine the wet and dry ingredients. Be careful not to overmix; stopping while there are still some flour lumps helps keep your cookies soft rather than tough.
Step 7: Fold in Butterfinger Bits
Time to add that extra crunch! Fold in 16 ounces of chopped Butterfinger pieces until just barely incorporated. This is where the magic happens—those bits will melt slightly during baking, creating an irresistible texture!
Step 8: Chill Your Dough
Cover your bowl and chill the dough for at least 15 minutes or up to an hour. If you can resist eating it raw (which is tough!), chilling helps develop better flavors and makes shaping easier.
Step 9: Preheat Oven
While waiting for the dough, preheat your oven to 350 degrees F. Line two baking sheets with parchment paper or silicone mats—this keeps things clean!
Step 10: Shape Dough Balls
Using your hands or a cookie scoop, shape the chilled dough into balls about two inches wide. Don’t worry if they look a little messy; they will spread out beautifully as they bake!
Step 11: Bake Your Cookies
Place them on the baking sheets about an inch apart from each other—this allows room for spreading during baking. Bake at 350 degrees F for about ten minutes until the edges are set but still puffy.
Step 12: Let Cool Before Enjoying
Allow them to cool on the pan for at least five minutes before transferring them to wire racks to cool completely. Patience here pays off—these cookies taste best when they reach room temperature!
Now you’re ready to enjoy these decadent Peanut Butter Butterfinger Cookies! Each batch makes about twenty-five cookies—perfect for sharing…or keeping all to yourself! Store any leftovers in a tightly sealed container for up to three days… if they last that long!
Pro Tips for Making Peanut Butter Butterfinger Cookies
Baking these cookies is a delightful experience, and a few simple tips can take them to the next level!
-
Use room temperature ingredients: Ingredients like butter and eggs mix together more smoothly when they’re at room temperature, resulting in a better texture for your cookies.
-
Don’t overmix the dough: Mixing too much can lead to tough cookies. Just mix until everything is combined; a few lumps are okay!
-
Chill the cookie dough: Chilling helps control the spread of the cookies while baking, ensuring they maintain their thick and chewy goodness.
-
Pay attention to baking time: Keep an eye on your cookies as they bake! They should be puffy with slightly set edges; underbaking just a tad will keep them soft and delicious.
-
Experiment with add-ins: Feel free to get creative! You can try adding chocolate chips or nuts alongside the Butterfinger bits for an extra crunchy surprise.
How to Serve Peanut Butter Butterfinger Cookies
These cookies not only taste amazing but also look delightful when served. Here are some fun ideas on how to present them!
Garnishes
- Chocolate drizzle: A quick drizzle of melted chocolate on top adds a touch of elegance and extra sweetness.
- Crushed peanuts: Sprinkling some crushed peanuts on top not only enhances the peanut flavor but also adds a nice crunch.
Side Dishes
- Milk: A classic pairing! The creamy texture of milk complements the sweetness of the cookies perfectly.
- Ice cream: Serve these warm cookies alongside a scoop of vanilla or chocolate ice cream for an indulgent dessert treat.
- Fruit salad: A refreshing fruit salad balances out the rich flavors of the cookies, adding brightness to your plate.
- Coffee or tea: Pairing with a hot beverage enhances the overall experience, making it perfect for afternoon snacks or dessert.
Enjoy baking and sharing these delightful Peanut Butter Butterfinger Cookies with family and friends!
Make Ahead and Storage
These Peanut Butter Butterfinger Cookies are perfect for meal prep! You can whip up a batch in advance and enjoy them throughout the week or even freeze some for later. Here’s how to store and freeze them properly:
Storing Leftovers
- Store leftover cookies in a tightly sealed container.
- Keep them at room temperature for up to 3 days.
- For longer freshness, consider refrigerating them.
Freezing
- To freeze cookie dough, shape it into balls and place them in a ziplock bag.
- Freeze for up to 3 months; label with the date for reference.
- Baked cookies can also be frozen in a sealed container for up to 4 weeks.
Reheating
- For frozen cookie dough, bake straight from the freezer, adding an extra minute or two to the baking time.
- After baking, gently press down with a spatula to help them spread.
- If reheating baked cookies, pop them in the microwave for about 10-15 seconds until warm.
FAQs
Here are some common questions about these delicious cookies!
Can I use natural peanut butter for Peanut Butter Butterfinger Cookies?
While you can technically use natural peanut butter, it’s best to avoid it for this recipe. Stick to regular peanut butter (like Jif) for the right texture and flavor.
How do I make Peanut Butter Butterfinger Cookies ahead of time?
You can prepare the dough ahead of time and chill it in the fridge or freeze it. This way, you can bake fresh cookies whenever you’re craving a sweet treat!
What if I can’t find Butterfinger Bits?
If you can’t locate Butterfinger Bits, simply chop regular Butterfinger bars into small pieces. The amount needed remains the same—16 ounces will work perfectly!
Can I substitute other candies instead of Butterfinger?
Absolutely! You can experiment with other crunchy candies like Heath bars or even chopped chocolate-covered pretzels for a unique twist on the recipe.
How many calories are in one Peanut Butter Butterfinger Cookie?
Each cookie contains approximately 169 calories. They are indulgent yet worth every bite!
Final Thoughts
I hope you’re as excited about these Peanut Butter Butterfinger Cookies as I am! Their delightful blend of flavors is sure to bring joy to your kitchen. Enjoy making this recipe and savoring each bite—you deserve it! If you try these cookies, let me know how they turn out. Happy baking!
Peanut Butter Butterfinger Cookies

Indulge in the delightful world of Peanut Butter Butterfinger Cookies, where creamy peanut butter meets crunchy candy bits! These cookies are not just a treat; they are a sweet escape, perfect for satisfying your cravings and impressing family and friends at gatherings. Each bite delivers a perfect balance of soft, thick texture complemented by the satisfying crunch of Butterfinger pieces. With their easy preparation and delectable flavor, these cookies are destined to become a cherished favorite in your kitchen.
- Prep Time: 20 minutes
- Cook Time: 10 minutes
- Total Time: 30 minutes
- Yield: Approximately 25 cookies 1x
- Category: Dessert
- Method: Baking
- Cuisine: American
Ingredients
- 3/4 cup softened butter (1 and 1/2 sticks)
- 1/2 cup granulated sugar
- 1/2 cup packed brown sugar
- 1 cup peanut butter (avoid natural)
- 1 large egg
- 1 and 1/2 teaspoons vanilla extract
- 1 and 1/2 cups all-purpose flour
- 1/2 teaspoon baking soda
- 1/2 teaspoon baking powder
- 1/4 teaspoon kosher salt
- 16 ounces chopped Butterfinger
Instructions
- In a bowl, cream together softened butter until smooth.
- Beat in granulated and brown sugars until fluffy.
- Mix in peanut butter until well combined.
- Add egg and vanilla extract, mixing until incorporated.
- In a separate bowl, whisk together flour, baking soda, baking powder, and salt. Gradually add to the wet mixture until combined.
- Fold in chopped Butterfinger pieces gently.
- Chill dough for at least 15 minutes.
- Preheat oven to 350°F (175°C). Line baking sheets with parchment paper.
- Shape chilled dough into balls (about two inches wide) and place on prepared sheets.
- Bake for about 10 minutes or until edges are set but centers remain puffy.
- Allow cooling on the pan before transferring to wire racks.
Nutrition
- Serving Size: 1 cookie (approximately 32g)
- Calories: 169
- Sugar: 10g
- Sodium: 102mg
- Fat: 8g
- Saturated Fat: 4g
- Unsaturated Fat: 3g
- Trans Fat: 0g
- Carbohydrates: 23g
- Fiber: 0g
- Protein: 3g
- Cholesterol: 20mg