Halloween Graveyard Cake Recipe
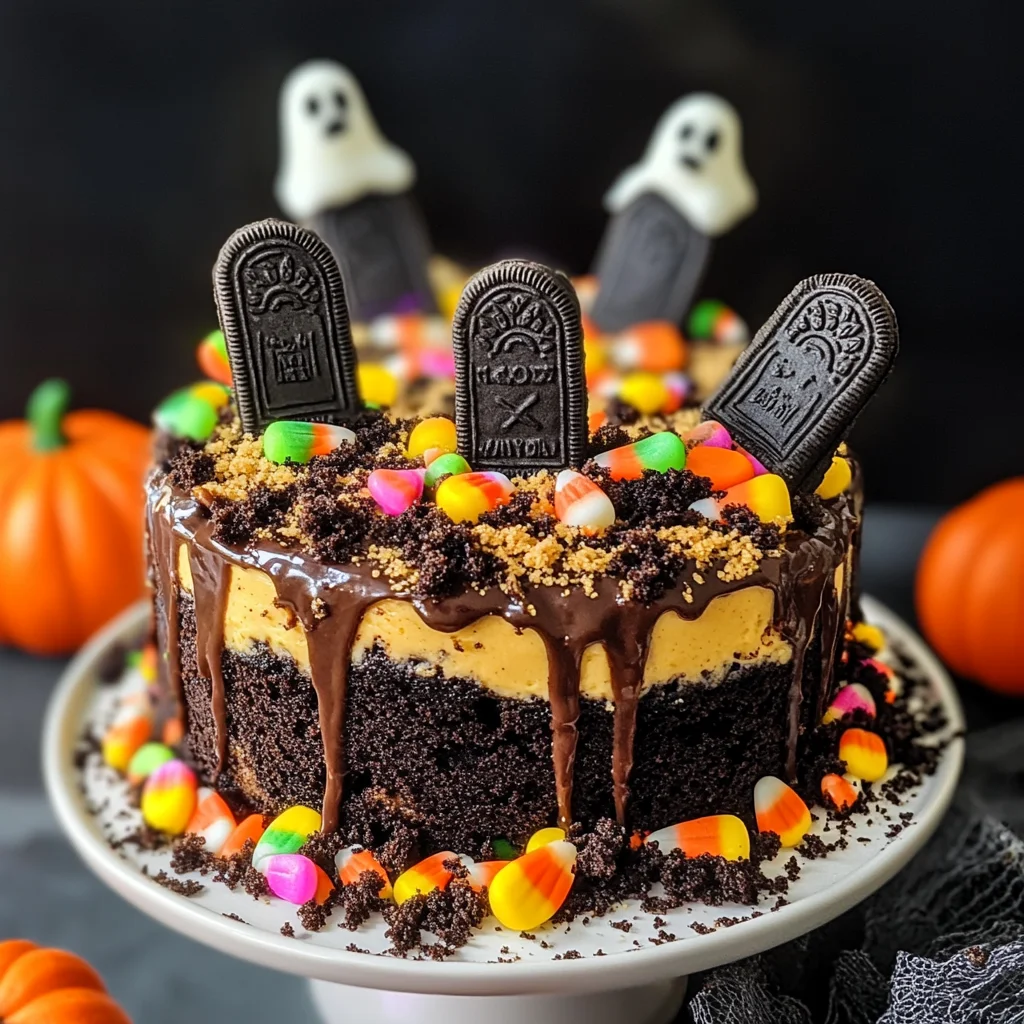
If you’re looking for a fun and spooky dessert that will wow your guests this Halloween, then you’ve come to the right place! This Halloween Graveyard Cake Recipe has become a beloved tradition in my household. Not only is it delicious, but it’s also super easy to make, making it perfect for busy weeknights or festive family gatherings. There’s just something magical about digging into a cake that’s hiding layers of creamy pudding and crunchy cookies, all while looking delightfully eerie!
This cake is sure to be a hit with both kids and adults alike. With its whimsical decorations and rich flavors, it brings smiles to everyone’s faces. Plus, it’s simple enough that even the little ones can help out in the kitchen. Let’s jump into why this recipe is so special!
Why You’ll Love This Recipe
- Quick and Easy: This cake comes together in just 30 minutes—perfect for last-minute parties!
- Family-Friendly Fun: Kids will love helping decorate with their favorite Halloween treats.
- Make-Ahead Convenience: You can prepare it a day in advance, saving time on the big night.
- Deliciously Decadent: The combination of chocolate cake, creamy pudding, and Oreo crumbs creates an irresistible treat.
- Spooky Presentation: It’s not just delicious; it looks fantastic on any Halloween dessert table!
Ingredients You’ll Need
This Halloween Graveyard Cake Recipe calls for simple, wholesome ingredients that you might already have on hand. They blend together beautifully to create a dessert that’s as tasty as it is charming.
For the Cake
- Chocolate Cake mix
- Ingredients as required on the box
For the Pudding Layer
- 5.1 ounce box vanilla instant pudding
- 2 cups skim milk (for pudding)
- Orange Gel Food coloring
For the Topping
- 15 Oreos (ground into crumbs)
- 12 Milano cookies
- Frosting or Edible Markers
- Pectin-based gummy candies, Candy Corn Pumpkins, Peeps Ghosts (optional)
Variations
One of the best things about this recipe is its flexibility! Feel free to get creative with your decorations or flavors. Here are some fun variations:
- Add Different Cookies: Swap Oreos for another kind of cookie—like chocolate chip or graham crackers—for a unique twist.
- Use Flavored Pudding: Try chocolate or butterscotch pudding instead of vanilla for added richness.
- Mix in Extras: Add mini chocolate chips or nuts into the cake batter for extra texture.
- Decorate Differently: Use different edible decorations like gummy worms or spooky sprinkles for variety.
How to Make Halloween Graveyard Cake Recipe
Step 1: Prepare the Cake
Begin by preparing your chocolate cake according to the package directions. Spread it evenly into a greased 9×13 glass baking dish and bake until it’s perfectly fluffy—aim for the shortest baking time recommended. This step ensures you have a tender base ready to soak up all that delicious pudding!
Step 2: Poke Holes in the Cake
Once your cake has baked to perfection, take it out of the oven and let it cool for just a few minutes before poking holes all over its surface using a wooden spoon handle or straw. The more holes you make, the better! These will allow all that yummy pudding to seep through and create a delightful surprise.
Step 3: Prepare the Pudding Mixture
While your cake cools completely, whisk together the vanilla pudding mix with skim milk and add a splash of orange gel food coloring. Mix until just blended—be careful not to let it thicken too much; you want it runny so it pours easily over your cake.
Step 4: Pour Pudding Over Cake
Next, pour that vibrant pudding mixture over your cooled cake! Make sure to gently pat down into those holes so every bite bursts with flavor. Don’t forget to tap the dish lightly on your counter; this helps settle everything nicely.
Step 5: Crush Up Those Oreos
In a large freezer bag, place your Oreos and crush them up using a rolling pin—or use a food processor if you prefer less mess! This crumbly topping adds an awesome crunch and dark color that fits perfectly with our graveyard theme.
Step 6: Refrigerate
Cover your cake and pop it in the refrigerator for at least an hour. This waiting time allows everything to set beautifully while keeping those Oreo crumbs nice and crunchy until you serve.
Step 7: Top with Oreo Crumbles
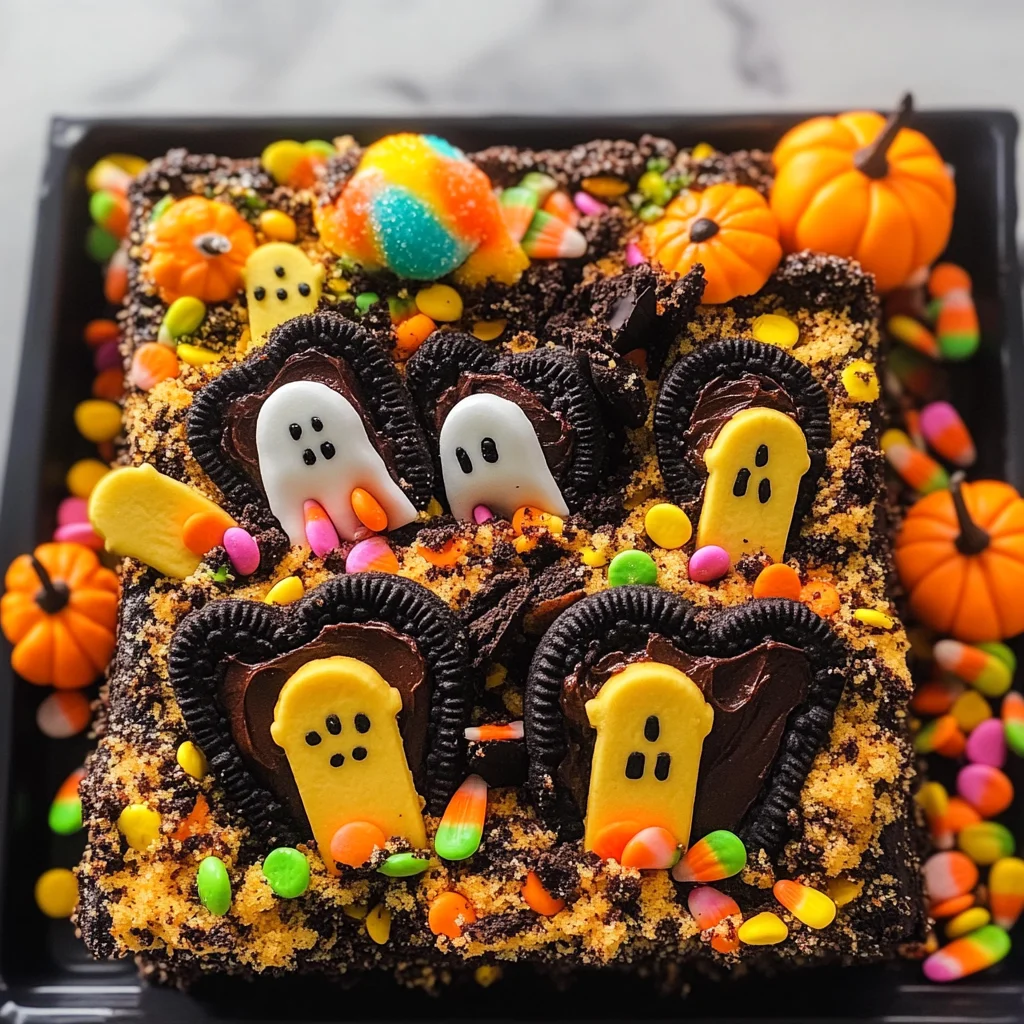
When you’re ready to serve, spread those crushed Oreos over the top of your pudding layer and pat them down gently—this will create that spooky “dirt” look we love!
Step 8: Decorate Your Graveyard
Now comes the fun part! Use frosting or edible markers to write “RIP” on Milano cookies as gravestones. Place them into the cake among piles of Peeps ghosts or candy corn pumpkins—you can let your creativity shine here!
Step 9: Enjoy!
Finally, slice up your Halloween Graveyard Cake and watch as faces light up when they discover its delicious secrets! If you’ve tried this recipe, please come back and share how it turned out in the comments below—I can’t wait to hear about your Halloween celebrations!
Pro Tips for Making Halloween Graveyard Cake Recipe
Creating the perfect Halloween Graveyard Cake can be a delightful experience! Here are some handy tips to ensure your dessert is a spooktacular success.
-
Choose Fresh Ingredients: Using fresh ingredients, especially for the cake and pudding, will enhance the flavor and texture of your dessert, making it even more enjoyable for your guests.
-
Don’t Rush the Cooling Process: Allowing the cake to cool slightly before adding the pudding ensures that it absorbs the pudding without becoming mushy. This helps maintain the cake’s structure while enhancing its moistness.
-
Be Generous with Poking Holes: The more holes you create in the cake, the better it will absorb the pudding. This results in a rich, flavorful dessert that doesn’t dry out and makes every bite a delight!
-
Set Before Serving: Letting your assembled cake sit in the refrigerator for at least an hour allows all flavors to meld together beautifully. It also gives time for the Oreo crumbs to soften slightly while still maintaining some crunch.
-
Customize Your Decorations: Feel free to get creative with your gravestone messages and candy decorations! Personalizing them adds a special touch that will impress your guests and make your dessert stand out.
How to Serve Halloween Graveyard Cake Recipe
Presenting your Halloween Graveyard Cake can be just as fun as making it! Here are some ideas on how to display this delightful treat:
Garnishes
- Sprinkles: Add some spooky-themed sprinkles on top of the Oreo layer for an extra festive touch. They add color and texture, enhancing visual appeal.
- Chocolate Syrup: A drizzle of chocolate syrup over individual servings can add richness and elegance to each slice.
- Whipped Cream: Serve with a dollop of non-dairy whipped cream on the side for those who enjoy a creamy contrast against the rich cake.
Side Dishes
- Pumpkin Soup: A warm bowl of pumpkin soup complements the sweet flavors of the cake, creating a comforting autumnal vibe that’s perfect for Halloween.
- Apple Slices with Caramel Dip: Crisp apple slices paired with a delicious caramel dip provide a refreshing contrast and balance out the sweetness from the cake.
- Vegetable Platter with Hummus: Offering a healthy veggie platter serves as a crunchy and savory counterpoint to your sweet dessert. Hummus adds creaminess without overwhelming flavors.
- Spooky Cheese Board: Assemble an array of cheeses, crackers, and fruits arranged in fun shapes like ghosts or bats. This playful addition adds texture and variety to your Halloween spread.
With these tips and serving suggestions, you’re all set to impress friends and family with your Halloween Graveyard Cake! Enjoy baking and have a hauntingly good time!
Make Ahead and Storage
This Halloween Graveyard Cake is perfect for meal prep, making it a fun and easy dessert to whip up ahead of time. You can prepare it a day or two in advance, allowing the flavors to meld beautifully while saving you time on the big day!
Storing Leftovers
- Store any leftover cake covered in plastic wrap or in an airtight container.
- Keep it in the refrigerator for up to 3 days.
- If you haven’t added the Oreo topping yet, it’s best to store that separately to maintain crunchiness.
Freezing
- While fresh cake tastes best, you can freeze leftovers if needed.
- Wrap the cake tightly in plastic wrap and then in aluminum foil to prevent freezer burn.
- It can be frozen for up to 2 months. Thaw overnight in the refrigerator before serving.
Reheating
- For best results, serve cold straight from the fridge. However, if you prefer it warm:
- Microwave individual pieces for about 15-20 seconds until just warmed through.
- Avoid overheating to keep the pudding layer intact.
FAQs
Here are some common questions about our Halloween Graveyard Cake Recipe.
Can I make this Halloween Graveyard Cake Recipe with gluten-free cake mix?
Absolutely! You can substitute a gluten-free chocolate cake mix for a deliciously spooky treat that everyone can enjoy.
How do I decorate my Halloween Graveyard Cake?
You can get creative! Use Milano cookies as gravestones, and add gummy candies, Candy Corn Pumpkins, or Peeps Ghosts for a festive touch.
What is a poke cake?
A poke cake is a type of cake where holes are poked into it after baking, allowing liquid (like pudding) to soak in, creating a moist and flavorful dessert.
How long does this Halloween Graveyard Cake Recipe last?
If stored properly in the fridge, it will last about 3 days. For extended storage, consider freezing it!
Final Thoughts
This Halloween Graveyard Cake is not just a dessert; it’s a delightful centerpiece that brings joy and creativity into your kitchen. Whether you’re hosting a spooky gathering or just sharing some festive fun with family, I hope you find joy in making this cake! Enjoy every bite and don’t forget to share your creations—I’d love to hear how yours turns out!
Halloween Graveyard Cake Recipe

Indulge in this easy Halloween Graveyard Cake Recipe that combines chocolate cake with creamy pudding. Get ready for some spooky fun—try it today!
- Prep Time: 15 minutes
- Cook Time: 25 minutes
- Total Time: 40 minutes
- Yield: Serves approximately 12 1x
- Category: Dessert
- Method: Baking
- Cuisine: American
Ingredients
- Chocolate cake mix (plus required ingredients)
- 5.1-ounce box vanilla instant pudding
- 2 cups skim milk
- Orange gel food coloring
- 15 Oreos (ground into crumbs)
- 12 Milano cookies
- Frosting or edible markers
- Pectin-based gummy candies and candy corn pumpkins (optional)
Instructions
- Prepare the chocolate cake according to package directions and bake in a greased 9×13 dish.
- Allow the cake to cool slightly, then poke holes across its surface using a wooden spoon handle.
- Whisk together the vanilla pudding mix with skim milk and orange gel food coloring until combined.
- Pour the pudding mixture over the cooled cake, ensuring it seeps into the holes.
- Crush Oreos in a bag or food processor and sprinkle over the pudding layer.
- Refrigerate for at least one hour to set.
- Decorate with Milano cookies as gravestones and optional candy decorations before serving.
Nutrition
- Serving Size: 1 serving
- Calories: 280
- Sugar: 20g
- Sodium: 250mg
- Fat: 10g
- Saturated Fat: 3g
- Unsaturated Fat: 7g
- Trans Fat: 0g
- Carbohydrates: 42g
- Fiber: 1g
- Protein: 4g
- Cholesterol: 10mg