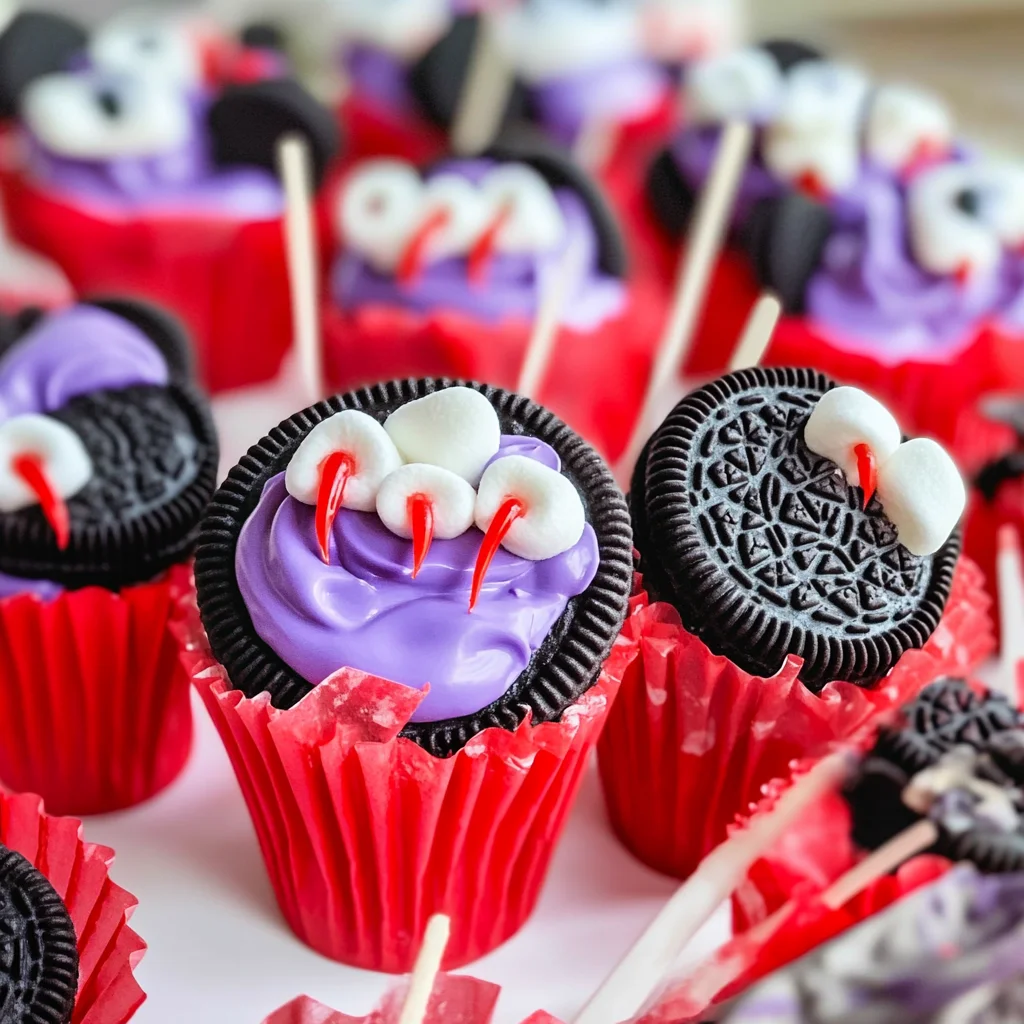
Vampire Oreo Pops
If you’re looking for a fun and delicious way to celebrate Halloween, you’ve come to the right place! These Vampire Oreo Pops are not only a treat for the taste buds but also an absolute delight to look at. I remember the first time I made these with my kids; we had such a blast decorating them and giggling over our spooky creations. They are perfect for Halloween parties, school treats, or just a fun family activity on a cozy evening.
What makes this recipe so special is how simple it is! In just 15 minutes, you can whip up these adorable pops that everyone will love. Plus, they can be made in advance, making them a fantastic option when you have a busy schedule. Trust me, once you sink your fangs into these Vampire Oreo Pops, you’ll want to make them every year!
Why You’ll Love This Recipe
- Super Easy to Make: With just a few ingredients and minimal prep time, anyone can create these cute treats.
- Family Fun: Involve the kids in the process! Decorating these pops is half the fun and sparks creativity.
- Make-Ahead Treat: Prepare these Vampire Oreo Pops ahead of time and store them until your event—no last-minute stress!
- Customizable: You can easily adjust colors and decorations to fit any theme or personal preference.
- Deliciously Sweet: The combination of Oreos and candy melts creates a tasty dessert that satisfies any sweet tooth.
Ingredients You’ll Need
These are some simple, wholesome ingredients that come together to create the magic of Vampire Oreo Pops. Don’t worry; you probably have most of them at home already!
- Oreos
- Lavender candy melts (black candy melts, white candy melts, and red candy melts)
- Mini vegan marshmallows
- 1-2 teaspoons of coconut oil
- Cupcake liners: Red (purple, black, green are good colors to use)
Variations
The beauty of these Vampire Oreo Pops lies in their flexibility! Feel free to get creative with your ingredients or decorations. Here are some fun variation ideas:
- Change Up the Colors: Use different colored candy melts like orange or green for a unique twist!
- Add Some Crunch: Mix in chopped nuts or sprinkles for an extra layer of texture.
- Try Different Cookies: Experiment with other types of cookies instead of Oreos for new flavors.
- Make Them Vegan-Friendly: Ensure all ingredients are plant-based by choosing vegan-friendly products.
How to Make Vampire Oreo Pops
Step 1: Melt the Candy
Start by melting your lavender candy melts. You can do this in the microwave or using a double boiler. If you use the microwave, heat in short bursts of 30 seconds to avoid burning. Stir in 1-2 teaspoons of coconut oil after they’re melted; this will help achieve that smooth coating we want for our pops!
Step 2: Assemble Your Pops
Take an Oreo cookie and dip one end into your melted lavender candy. Use a fork to gently shake off any excess coating—this step ensures even coverage without clumping up. Then, insert a lollipop stick into the opposite end of the cookie while the coating is still wet.
Step 3: Add Some Spooky Flair
While the lavender coating is still soft, press mini vegan marshmallows onto either side of the cookie to form vampire fangs. This part is where you can really let your creativity shine! Feel free to add eyes made from more melted chocolate or candy if you’re feeling extra festive.
Step 4: Let Them Set
Place your decorated Vampire Oreo Pops upright in cupcake liners or styrofoam blocks while they set up completely. This step is crucial because it helps maintain their shape as they cool down.
Now that you’ve followed these steps, you’re ready to enjoy your spooktacular creations! Happy decorating!
Pro Tips for Making Vampire Oreo Pops
Creating these delightful Vampire Oreo Pops is a breeze, especially with a few helpful tips to ensure they turn out perfectly every time!
-
Use fresh ingredients: Ensuring your Oreos and candy melts are fresh will enhance the flavor and texture of your pops, making them taste even better.
-
Melt candy carefully: When melting your candy melts, do it in short intervals in the microwave. This prevents overheating and ensures a smooth consistency for easy dipping.
-
Chill between layers: After dipping the Oreos in one layer of candy melt, let them chill for a few minutes before adding additional decorations. This helps each layer set properly and keeps your decorations from sliding off.
-
Experiment with colors: While lavender candy melts are great for this recipe, don’t hesitate to mix and match colors! Using different shades can add an extra fun element to your Halloween treats.
-
Get creative with shapes: If you want to switch things up, try using other cookie shapes or adding sprinkles for extra flair. The sky’s the limit when it comes to creativity!
How to Serve Vampire Oreo Pops
Presenting your Vampire Oreo Pops is just as important as making them! Here are some fun ways to serve these spooky treats that will impress your guests.
Garnishes
- Edible glitter: A sprinkle of edible glitter can make these pops sparkle and give them an enchanting touch that’s perfect for Halloween.
- Colored sprinkles: Use themed sprinkles—like bats or stars—to add an extra layer of fun and whimsy to your pops.
Side Dishes
- Witch’s Brew Punch: A refreshing non-alcoholic punch made with fruit juices and soda can provide a festive drink option that pairs perfectly with your sweet treats.
- Veggie Platter: A colorful assortment of fresh veggies served with a creamy dip can balance out the sweetness of the Oreo pops, offering a healthier option.
- Pumpkin Muffins: These moist muffins bring a seasonal flavor that complements the sweet treats while keeping in theme for Halloween festivities.
- Fruit Skewers: Colorful fruit skewers made with strawberries, grapes, and melon add brightness to your dessert table while providing a refreshing contrast to the rich cookies.
With these serving suggestions and pro tips, your Vampire Oreo Pops will not only be delicious but also visually captivating. Happy Halloween baking!

Make Ahead and Storage
These Vampire Oreo Pops are perfect for meal prep! You can make them ahead of time for a Halloween party or just to enjoy as a sweet treat throughout the week. Here’s how to store and preserve their deliciousness.
Storing Leftovers
- Store any leftover Vampire Oreo Pops in an airtight container.
- Keep them in the refrigerator for up to one week to maintain freshness.
- If you want to avoid sticking, you can place parchment paper between layers of pops.
Freezing
- To freeze, place the Vampire Oreo Pops on a baking sheet lined with parchment paper.
- Freeze until solid, then transfer them to an airtight container or freezer bag.
- They can be frozen for up to two months—perfect for future spooky celebrations!
Reheating
- These pops are best enjoyed cold or at room temperature, so there’s no need to reheat them.
- Just take them out of the fridge and let them sit for a few minutes before serving.
FAQs
You might have some questions about making these delightful treats! Here are some common inquiries:
Can I use different colors of candy melts for my Vampire Oreo Pops?
Absolutely! Feel free to experiment with various colors of candy melts. Black, purple, green, and red are all great choices that will add a festive touch to your Vampire Oreo Pops.
How long do Vampire Oreo Pops last?
When stored properly in an airtight container in the fridge, your Vampire Oreo Pops will stay fresh for up to one week. Just be sure to keep them cool!
Can I use regular marshmallows instead of mini vegan marshmallows for these pops?
While mini vegan marshmallows work perfectly for this recipe, you can substitute with regular marshmallows if you prefer. Just remember they won’t align with vegan preferences.
What occasion are Vampire Oreo Pops good for?
Vampire Oreo Pops are ideal for Halloween parties, themed gatherings, or just as a fun dessert to share with family. They’re sure to impress both kids and adults alike!
Final Thoughts
I hope you enjoy making these whimsical Vampire Oreo Pops as much as I do! They’re not only fun to create but also perfect for sharing with friends and family during the Halloween season. Remember, it’s all about having fun in the kitchen and letting your creativity shine. Happy snacking!
Vampire Oreo Pops

Get ready to celebrate Halloween with these delightful Vampire Oreo Pops! These fun treats are not only visually striking but also incredibly easy to make, making them perfect for family activities or festive gatherings. In just 15 minutes, you can whip up these spooky delights that will charm both kids and adults alike. The combination of crunchy Oreos and smooth candy melts creates a satisfyingly sweet experience. Plus, they can be made in advance, ensuring you’re stress-free when the festivities begin. Let’s dive into the recipe and get creative with your very own Vampire Oreo Pops!
- Prep Time: 10 minutes
- Cook Time: 5 minutes
- Total Time: 15 minutes
- Yield: Approximately 12 pops 1x
- Category: Dessert
- Method: No-Bake
- Cuisine: American
Ingredients
- Oreos
- Lavender candy melts (or colors of your choice)
- Mini vegan marshmallows
- 1–2 teaspoons coconut oil
- Cupcake liners in festive colors
Instructions
- Melt lavender candy melts in a microwave-safe bowl in 30-second intervals, stirring until smooth. Mix in coconut oil for a glossy finish.
- Dip one end of each Oreo into the melted candy, allowing excess to drip off. Insert a lollipop stick into the opposite side while the coating is still wet.
- Press mini vegan marshmallows onto either side of the coated Oreo to create vampire fangs.
- Place the pops upright in cupcake liners or styrofoam blocks to set completely.
Nutrition
- Serving Size: 1 serving
- Calories: 150
- Sugar: 18g
- Sodium: 30mg
- Fat: 7g
- Saturated Fat: 5g
- Unsaturated Fat: 2g
- Trans Fat: 0g
- Carbohydrates: 22g
- Fiber: 1g
- Protein: 1g
- Cholesterol: 0mg